Showing posts with label Unix. Show all posts

Wednesday, January 21, 2015

Useful Vim Editor navigation keys you should remember

Navigation is a vital part of text editing. To be very productive, you should be aware of all possible navigation shortcuts in your editor. In this article, let us review the following 8 Vi / Vim navigation options.
  1. Line navigation
  2. Screen navigation
  3. Word navigation
  4. Special navigation
  5. Paragraph navigation
  6. Search navigation
  7. Code navigation
  8. Navigation from command line

1. Vim Line Navigation

Following are the four navigation that can be done line by line.
  • k – navigate upwards
  • j – navigate downwards
  • l – navigate right side
  • h – navigate left side
By using the repeat factor in VIM we can do this operation for N times. For example, when you want to
go down by 10 lines, then type “10j”.

Within a line if you want to navigate to different position, you have 4 other options.
  • 0 – go to the starting of the current line.
  • ^ – go to the first non blank character of the line.
  • $ – go to the end of the current line.
  • g_ – go to the last non blank character of the line.

2. Vim Screen Navigation

Following are the three navigation which can be done in relation to text shown in the screen.
  • H – Go to the first line of current screen.
  • M – Go to the middle line of current screen.
  • L – Go to the last line of current screen.
  • ctrl+f – Jump forward one full screen.
  • ctrl+b – Jump backwards one full screen
  • ctrl+d – Jump forward (down) a half screen
  • ctrl+u – Jump back (up) one half screen

3. Vim Special Navigation

You may want to do some special navigation inside a file, which are:
  • N% – Go to the Nth percentage line of the file.
  • NG – Go to the Nth line of the file.
  • G – Go to the end of the file.
  • `” – Go to the position where you were in NORMAL MODE while last closing the file.
  • `^ – Go to the position where you were in INSERT MODE while last closing the file.
  • g – Go to the beginning of the file.

4. Vim Word Navigation

You may want to do several navigation in relation to the words, such as:
  • e – go to the end of the current word.
  • E – go to the end of the current WORD.
  • b – go to the previous (before) word.
  • B – go to the previous (before) WORD.
  • w – go to the next word.
  • W – go to the next WORD.

WORD – WORD consists of a sequence of non-blank characters, separated with white space.
word – word consists of a sequence of letters, digits and underscores.

Example to show the difference between WORD and word
  • 192.168.1.1 – single WORD
  • 192.168.1.1 – seven words.

5. Vim Paragraph Navigation

  • { – Go to the beginning of the current paragraph. By pressing { again and again move to the previous paragraph beginnings.
  • } – Go to the end of the current paragraph. By pressing } again and again move to the next paragraph end, and again.

6. Vim Search Navigation

  • /i – Search for a pattern which will you take you to the next occurrence of it.
  • ?i – Search for a pattern which will you take you to the previous occurrence of it.
  • * - Go to the next occurrence of the current word under the cursor.
  • # - Go to the previous occurrence of the current word under the cursor.

7. Vim Code Navigation

% – Go to the matching braces, or parenthesis inside code.

8. Vim Navigation from Command Line

Vim +N filename: Go to the Nth line of the file after opening it.
vim +10 /etc/passwd

Vim +/pattern filename: Go to the particular pattern’s line inside the file, first occurrence from first. In the following example, it will open the README file and jump to the first occurrence of the word “install”.
vim +/install README

Vim +?patten filename: Go to the particular pattern’s line inside the file, first occurrence from last. In the following example, it will open the README file and jump to the last occurrence of the word “bug”.


vim +?bug README

The Linux Directory/File System Structure

Have you wondered why certain programs are located under /bin, or /sbin, or /usr/bin, or /usr/sbin?
For example, less command is located under /usr/bin directory. Why not /bin, or /sbin, or /usr/sbin? What is the different between all these directories?
In this article, let us review the Linux filesystem structures and understand the meaning of individual high-level directories.

1. / – Root

  • Every single file and directory starts from the root directory.
  • Only root user has write privilege under this directory.
  • Please note that /root is root user’s home directory, which is not same as /.

2. /bin – User Binaries

  • Contains binary executables.
  • Common linux commands you need to use in single-user modes are located under this directory.
  • Commands used by all the users of the system are located here.
  • For example: ps, ls, ping, grep, cp.

3. /sbin – System Binaries

  • Just like /bin, /sbin also contains binary executables.
  • But, the linux commands located under this directory are used typically by system aministrator, for system maintenance purpose.
  • For example: iptables, reboot, fdisk, ifconfig, swapon

4. /etc – Configuration Files

  • Contains configuration files required by all programs.
  • This also contains startup and shutdown shell scripts used to start/stop individual programs.
  • For example: /etc/resolv.conf, /etc/logrotate.conf

5. /dev – Device Files

  • Contains device files.
  • These include terminal devices, usb, or any device attached to the system.
  • For example: /dev/tty1, /dev/usbmon0

6. /proc – Process Information

  • Contains information about system process.
  • This is a pseudo filesystem contains information about running process. For example: /proc/{pid} directory contains information about the process with that particular pid.
  • This is a virtual filesystem with text information about system resources. For example: /proc/uptime

7. /var – Variable Files

  • var stands for variable files.
  • Content of the files that are expected to grow can be found under this directory.
  • This includes — system log files (/var/log); packages and database files (/var/lib); emails (/var/mail); print queues (/var/spool); lock files (/var/lock); temp files needed across reboots (/var/tmp);

8. /tmp – Temporary Files

  • Directory that contains temporary files created by system and users.
  • Files under this directory are deleted when system is rebooted.

9. /usr – User Programs

  • Contains binaries, libraries, documentation, and source-code for second level programs.
  • /usr/bin contains binary files for user programs. If you can’t find a user binary under /bin, look under /usr/bin. For example: at, awk, cc, less, scp
  • /usr/sbin contains binary files for system administrators. If you can’t find a system binary under /sbin, look under /usr/sbin. For example: atd, cron, sshd, useradd, userdel
  • /usr/lib contains libraries for /usr/bin and /usr/sbin
  • /usr/local contains users programs that you install from source. For example, when you install apache from source, it goes under /usr/local/apache2

10. /home – Home Directories

  • Home directories for all users to store their personal files.
  • For example: /home/john, /home/nikita

11. /boot – Boot Loader Files

  • Contains boot loader related files.
  • Kernel initrd, vmlinux, grub files are located under /boot
  • For example: initrd.img-2.6.32-24-generic, vmlinuz-2.6.32-24-generic

12. /lib – System Libraries

  • Contains library files that supports the binaries located under /bin and /sbin
  • Library filenames are either ld* or lib*.so.*
  • For example: ld-2.11.1.so, libncurses.so.5.7

13. /opt – Optional add-on Applications

  • opt stands for optional.
  • Contains add-on applications from individual vendors.
  • add-on applications should be installed under either /opt/ or /opt/ sub-directory.

14. /mnt – Mount Directory

  • Temporary mount directory where sysadmins can mount filesystems.

15. /media – Removable Media Devices

  • Temporary mount directory for removable devices.
  • For examples, /media/cdrom for CD-ROM; /media/floppy for floppy drives; /media/cdrecorder for CD writer

16. /srv – Service Data

  • srv stands for service.
  • Contains server specific services related data.
  • For example, /srv/cvs contains CVS related data.

Reverse SSH Tunnel on Linux

Reverse SSH is a technique that can be used to access systems (that are behind a firewall) from the outside world.
As you already know SSH is a network protocol that supports cryptographic communication between network nodes. Using this protocol, you can do a secure remote login, secure copy from/to a remote machine etc.

You’ll typically do the following to connect to a remote server securely using ssh command.
$ ssh [your-account-login]@[server-ip]

What is Reverse SSH?

SSH is very good tool to access remote machine or server securely. But, the problem arises when you try to connect to a remote server which is behind a firewall and this firewall denies any incoming connection or data transfer request that has no prior outgoing request. This means that only those connections would be allowed which are initiated by the remote server machine. This is a real problem for those who want to access this server machine remotely.
Reverse SSH provides a technique through which you can simulate a normal SSH to this remote server machine.
The main problem is that firewall is rejecting ssh connection that your machine is trying to establish with remote server machine. But you know that the same firewall will not have any problem with the connections originating from server machine. So, why not ask some one who is sitting behind the firewall to do something with which you can achieve your goal of remotely accessing the server. To do this we have to use ssh -R option.
This is the description of the ssh -R option from the man page:
-R [bind_address:]port:host:hostport
Specifies that the given port on the remote (server) host is to be forwarded to the given host and port on the local side. This works by allocating a socket to listen to port on the remote side, and whenever a connection is made to this port, the connection is forwarded over the secure channel, and a connection is made to host port hostport from the local machine.
So you can use ssh command, with -R option, (from server in our case) to connect to your machine, allocate a port there and make sure that any connection request on that port is forwarded to ssh port of the remote server.
Instead of your machine doing an ssh, the server machine does an ssh and through port forwarding makes sure that you can ssh back to server machine.

How to Create a Reverse SSH Tunnel?

Here is the command your friend sitting on remote server side should run on the server :
ssh -fN -R 7000:localhost:22 username@yourMachine-ipaddress
So this ssh connection request originating from remote server to your machine will make sure that any ssh connection request for port 7000 on your machine is forwarded to port 22 of remote server.
Now do an ssh connection request from your machine to your own machine at port 7000:
ssh username@localhost -p 7000
Here, though it may seem like you are doing ssh on localhost but your request would be forwarded to remote host. So, you should use your account ‘username’ on remote server and when prompted for password, enter the corresponding password.
This should clear most of the aspects related to reverse ssh technique. But, there is one catch. The catch is that you have to ask a friend of yours — who is sitting behind the firewall — to create an ssh connection first. This is not feasible every time.
To overcome this problem, what you can do is that you can set up a machine which is out of firewall (just like yours) in a way that it is always on. Lets call this machine as machine_z.
The benefit of machine_z is that you can once do this reverse ssh set up on it and leave it like this. At any point of time, when you need to login to remote machine, you can ssh into machine_z on a specified port (as shown earlier) and your connection request will be forwarded to remote server machine and Voila, you will be running commands on remote server.
On a related note, you can also setup no password SSH to connect to another server without entering the password.
Some settings that you need to configure on machine_z would include :
  • Make sure that the parameters TCPKeepAlive, ClientAliveInterval, ClientAliveCountMax and GatewayPorts are set to appropriate values. These parameters are found in /etc/sshd_config or /etc/ssh/sshd_config file
  • If you make some changes to above parameters, you should restart sshd daemon to reflect the changes.
  • Also, make sure that you run the first ssh command (that is executed from the remote server to machine_z) using nohup command so that this ssh session becomes immune to hangups which can happen when a user logs out.

SSH Tunneling on Linux, Unix or BSD Server to bypass NAT

How can I set encrypted tunnel between my desktop/laptop computer and server in a remote data center to bypass the limits in a network? How do I create a reverse SSH tunnel on Unix-like systems?

SSH tunnelling can be thought as a poor-man's-VPN. It is handy in situations where you would like to hide your traffic from any body who might be listening on the wire or eavsdropping. 

You can use such tunnel between your computer and your Unix/BSD/Linux server to bypass limits placed by a network or to bypass NAT, and more.

More about the Internet protocol, ports, tcp and udp

The Internet protocol is nothing but a set of rules for sending information between your desktop and the server on the Internet (or WAN or Lan). Each computer at least has one IP address. Each rule is like a language and in computer science you call it as a protocol. One can use protocols for communication over the Internet.

Common application protocol

For example, you can use HTTP (Hypertext Transfer Protocol) or HTTPS (Hypertext Transfer Protocol Secure) protocol to view images or download files from the Internet. You can use DNS (Domain Name System) protocol translates domain names such as www.cyberciti.biz, which can be easily memorized by humans, to the numerical IP addresses such as 75.126.153.206 and vice versa. You can use ssh (Secure Shell) for secure data communication, remote command-line login, remote command execution, and more.

Our sample setup

                        ///////////
                       //Internet//
                       ////////////
                            |
     +---------------+      |       +-------------+
     | Unix/Linux    |      |       | Linux/Unix  |
     | Server with   +------+-------+ OSX/*BSD    |
     | OpenSSH SSHD  |              | Client      |
     +---------------+              +-------------+
       randomhost.net            client1.cyberciti.biz
     75.126.153.206                  192.168.1.42
                               (loopback interface 127.0.0.1)
Where,
  • randomhost.net - You have an accounts on this Linux/Unix based server.
  • client1.cyberciti.biz - Your private desktop/laptop computer that you use to connect to server1.cyberciti.biz server. You need to use loopback interface with the IP address 127.0.0.1. Only apps installed on the desktop such as browser, irc client, email client and more have access to 127.0.0.1.

Example: SSH tunnel for an IRC client

A tunnel between local port 8888 on the local interface (IP 127.0.0.1) and the IRC server at irc.freenode.net, bound to a remote machine's port 6667. You are going connect to it using the loopback interface:
                        ///////////
                       //Internet//
                       ////////////
                            |
     +---------------+      |       +-------------+
     | Unix/Linux    |      |       | Linux/Unix  |
     | Server with   +------+-------+ OSX/*BSD    |
+----+ OpenSSH SSHD  |              | Client      |
|    +---------------+              +-------------+
|      randomhost.net            client1.cyberciti.biz
|    75.126.153.206                  192.168.1.42
|                              (loopback interface 127.0.0.1:8888) <=== SSH client
|
|       +-----------------------+
+-------+ irc.freenode.net:6667 |
        +-----------------------+
If you login to your shell account with: ssh myuser@randomhost.net for SSH tunnelling you have to add additional arguments. It goes like this:
 
ssh -L 8888:irc.freenode.net:6667 myuser@randomhost.net
 
If the server/shell account you are using to tunnel through is listening on a different port, for example 2745, it would be written like this:
 
ssh -p2745 -L8888:irc.freenode.net:6667 myuser@randomhost.net
 
This will open a tunnel between your computer to irc.freenode.net through your shell account on randomhost.net. All traffic will go through your shell account box as encrypted SSH traffic before reaching irc.freenode.net. Your computer now acts like a irc server listening to port 8888. Replace it with any ports you want above 1024 to avoid conflict.
To connect to your local port as if it's irc server. On irssi this would be:
  /server 127.0.0.1 8888
This will also apply for any other irc clients such as X-Chat. Use 127.0.0.1/8888 for server name and you are good to go. Other fields remain the same.

Howto setup a reverse SSH tunnel

In a scenario where a machine is behind NAT or company firewall a normal SSH tunnel won't work. To overcome this, we have to make use of reverse SSH tunnel. To achieve this, you need an internet reachable box along with the machine behind NAT/firewall. During this guide we will call the machine behind NAT/firewall a NATbox and internet reachable machine an OPENbox.
For reverse SSH Tunnel, there are basically three ports involved. One is the SSH port of workstation, we use it forward the reverse tunnel port into it. The second, is the reverse tunnel port which gets forwarded to workstation's SSH port. The third, is the SSH port of the public box, we need that port to SSH into public box.
From outside if you use public box's SSH port, you log in to that box. If you use reverse tunnel port you get forwarded to workstation. You must be careful about usernames when doing this.
public box ip + public box SSH port + public box username -> access to public box
public box ip + reverse tunnel port + workstation username -> access to workstation
To establish reverse tunnel from workstation, you will use:
public box ip + public box SSH port + public box username 
And setup the reverse tunnel on a different random port and forward it to local SSH port.
To further protect the SSH daemon, you can implement port knocking where the SSH port is blocked by default and when you send special packets the port is opened for you. You can have the SSH port opened for certain IPs.

Example

So, let us consider, OPENbox is listening to SSH on port 1234. Type following on NATbox:
 
ssh -p1234 -R 5555:localhost:22 openboxuser@OPENbox.example.com
 
This will initiate a connection from behind the NATd/firewalled box to the publicly reachable box listeing to SSH on port 1234. Once the connection is established it will create a reverse tunnel at port 22 for the remote party to connect and get in. Type the following command on OPENbox:
 
ssh  -p5555 natboxuser@localhost
 
Since the NATd/firewalled box has an established connection to OPENbox, the tunnel will go through the same channel. In addition, type the following from anywhere else to access NATbox which will tunnel the traffic through OPENbox:
 
ssh -p5555 natboxuser@OPENbox
 
This requires an additional setup on the OpenSSHD server, add the lines to/etc/ssh/sshd_config
 GatewayPorts yes
Save and close the file. Make sure you restart/reload the SSHD on the remote server.

Summary

The syntax is as follows to access remote server port without modifying firewall settings:
 ## Syntax ##
ssh -f -L {local-port}:localhost:{remote-server-port} user@remote.server-name-here.org
 
# Use port 8888 on the localhost to connect to port 4444 on host foo for user bar and run in the background#
# Use port 8888 for your apps such as firefox, xchat, and more #
ssh -D 8888 -f -C -q -N -p 4444 foo@bar &
 
Where,
  1. -f : Requests ssh to go to background just before command execution.
  2. -L port : Specifies that the given port on the local (client) host is to be forwarded to the given host and port on the remote side.
  3. -p port : Port to connect to on the remote host.
  4. -R : Specifies that the given port on the remote (server) host is to be forwarded to the given host and port on the local side.
  5. -D port: Specifies a local "dynamic" application-level port forwarding.
  6. -C : Requests compression of all data. This is useful for speeding up connection.
  7. -q : Quiet mode. Causes most warning and diagnostic messages to be suppressed.
  8. -N: Do not execute a remote command. This is useful for just for warding ports.
For more information see man pages: ssh(1), sshd_config(5), ssh_config(5).

PostgreSQL: Installation and configuration

Here's another plug for FreshPorts.  I've been playing with ideas and I've come up a few good improvements.  But they will require a database with more features than mySQL.  Specifically, I'm going to need stored procedures and functions.I actually installed PostgreSQL back in late July, but never did anything with it.  This article will help you along the way.
PostgreSQL caught my attention because it's been recommended by others.  It also has the stored procedures and triggers.   These facilities will form the heart and soul of the new database.

NOTE: Since this article was written, the path for the PostgreSQL binaries has changed. When I wrote this article, the pathnames were /usr/local/pgsql/bin/. I have since updated the article to refer to the new location /usr/local/bin/.
Installation - from ports
If you want to use php first, well, I've already installed that.  I'm not sure what you'd do if you want PostgreSQL and php.  Perhaps install mod_php later.  Does anyone know?  If so, add your comments.As always, I'm installing this from ports.  If you haven't already installed your ports tree, you should.  Because this is how easy it is to install a port:
# cd /usr/ports/databases/postgresql7/
# make install
There.  Done.
Actually, I'm sure there might have been more to it than that.  Such as specifying php options.  But I can't recall.
You also need to initialize the database with the following command [note that the user pgsql is not used on all systems, on some systems it might be postgres):
# su -l pgsql -c initdb
This database system will be initialized with username "pgsql".
This user will own all the data files and must also own the server process.

Creating directory /usr/local/pgsql/data
Creating directory /usr/local/pgsql/data/base
Creating directory /usr/local/pgsql/data/global
Creating directory /usr/local/pgsql/data/pg_xlog
Creating template1 database in /usr/local/pgsql/data/base/1

[snip]

Success. You can now start the database server using:

    /usr/local/bin/postmaster -D /usr/local/pgsql/data
or
    /usr/local/bin/pg_ctl -D /usr/local/pgsql/data -l logfile start
NOTE: Recent versions of FreeBSD will require this entry in /etc/rc.conf in order for PostgreSQL to start:
postgresql_enable="YES"
Now I'm ready to start the database server:
/usr/local/etc/rc.d/010.pgsql.sh start
NOTE: in recent versions of PostgreSQL (e.g. 8.2), the command is:
/usr/local/etc/rc.d/postgresql start
That should be the name of the file (i.e. 010.pgsql.sh) but if you can't find it, just hunt around in that directory for a simlarly named file.
Allowing users to use psql
This section documents the steps required to allow a user to access a database.  You may also want to read the instructions for adding a database user.  In this section, the term user refers to a login.I like the way PostgreSQL works.  It creates a special user for you, pgsql.  This user does all the work.  The database runs as this user, and all work (database creation, adding users, etc) is done as this user.
NOTE: pgsql is not used on all systems, on some systems it might be postgres.
The first step is to add myself as a user, so I don't have to do all my work as pgql.  Here's how I added myself as a user.  I typed the bits in bold. See also the NOTE below regarding the path.
$ su -l
Password:
[root@set:~] # su pgsql
$ /usr/local/bin/createuser dan
Shall the new user be allowed to create databases? (y/n) y
Shall the new user be allowed to create more new users? (y/n) y
CREATE USER
Done.  Now that I've added myself as a user who can create databases, I can use my normal login.
NOTE: In more recent versions of PostgreSQL, the binary is /usr/local/bin/createuser.
Adding a database
Now I dropped back to my usual login and created a database.
$ logout
[root@set:~] # logout
[dan@set:/usr/home/dan] $ /usr/local/bin/createdb mydb
CREATE DATABASE
Done.
Creating a user for this database
Now I dropped back to my usual login and created a database.
$ /usr/local/bin/psql mydb
Welcome to psql, the PostgreSQL interactive terminal.

Type: \copyright for distribution terms
\h for help with SQL commands
\? for help on internal slash commands
\g or terminate with semicolon to execute query
\q to quit

mydb=#
Now I'll create a user, tester,  for this database.
mydb=# create user tester with password 'mypassword';
CREATE USER
To remove a user:
mydb=# drop user tester;
DROP USER
NOTE: In recent versions of PostgreSQL, CREATE USER has been deprecated by CREATE ROLE.
Creating groups
You can also create groups and place the users in those groups.  You can grant permissions collectively to the group instead of individually to the user.
mydb=# CREATE GROUP testers WITH USER dan;
CREATE GROUP
Then you can grant SELECT permission on table thedata   permissions to group testers:
mydb=# GRANT SELECT ON thedata TO GROUP testers;
CHANGE
Creating a table
I created a rather simple table for my testing.
mydb=# create table test (id serial, name varchar(10));
NOTICE: CREATE TABLE will create implicit sequence 'test_id_seq'
for SERIAL column 'test.id'
NOTICE: CREATE TABLE/UNIQUE will create implicit
index 'test_id_key' for table 'test'
CREATE
Then I inserted data:
mydb=# insert into test (name) values ('test');
INSERT 18879 1
mydb=# insert into test (name) values ('test2');
INSERT 18880 1
Then I read that data back out:
freshports2=# select * from test;
id | name
----+-------
1 | test
2 | test2
(2 rows)
Getting php going
I create a simple php test in an existing website.  For help on creating websites, look at Apache - virtual hosts.I added this to testpsql.php3 in my website.  Note the amended while loop at the end of this section.
<head>
<title>PostgreSQL test</title>
<body>

<?php
$database=pg_connect("dbname=mydb user=test password=mypassword");
if ($database) {
   $result = pg_exec ($database, "select * from test");
   if ($result) {
      echo pg_numrows($result) . " rows to fetch\n";
      echo "<table>\n";
      $i = 0;
      while ($myrow = pg_fetch_array ($result, $i)) {
         $i++;
         echo "   <tr><td>" . $myrow["id"] . "</td><td>" . 
                              $myrow["name"] . "</td></tr>\n";
         if ($i > 10) break;
      }
      echo "</table>\n";
   } else {
      echo "read from test failed";
   }

   pg_exec ($database, "end");
} else {
   echo "no connection";
}
?>

</body></html>
As you can see, I had to manually break the loop.  I have no idea why.  I thought pg_fetch_array would return false at the end of the result set, as mentioned in the documentation.  But it didn't.  So far, it appears I'll have to use a for  loop for that and not a while.  Any ideas on why should be added as comments.  pg_fetch_array was behaving like that?  It seems to be standard behaviour.
A search at http://google.com found this example, which I used to create this amended while loop:
for ($i = 0; $i < $NumRows; $i++) {             
   $myrow = pg_fetch_array ($result, $i);       
   echo "   <tr><td>" . $myrow["id"] . "</td><td>" . 
                 $myrow["name"] . "</td></tr>\n";
}
What's next?
I would like a Windows GUI inteface to PostgreSQL.  Any suggestions should be added to the comments.   I found ZEOS, but couldn't get it to connect.  I suspect someone wrong with my access rights, but I was looking at /usr/local/pgsql/lib/pg_hba.conf.I'm sure the next PostgreSQL article will have more information.
backups
It's time I added backups to this article.  This information is taken from the Admin documentation at /usr/local/share/doc/pgsql/admin/.A backup is done with this:
% pg_dump dbname > dbname.pgdump
A restore is done with this:
cat dbname.pgdump | psql dbname
Depending upon your path settings, you may have to specify the full path to these binaries.  Under FreeBSD, this would be /usr/local/bin/pg_dump.
For a backup script, please read the section on mySQL backups in the article I wrote for mySQL. Just substitute pg_dump for mysqldump.
Various notes
Tonight I was upgrading, accidentally mind you, from 7.0.3 to 7.1.3. I did this without first deinstalling the old version. Bad idea. As a precaution, you should always dump your old databases before upgrading. I didn't. When I tried to run psql, I was getting these errors:
# psql FreshPort2Test
psql: FATAL 1: SetUserId: user 'root' is not in 'pg_shadow'
The mistake was that I was doing this as root. DOH! I had created all my databases as dan. So asking on IRC, I was told to do this:
# su - pgsql
# psql FreshPort2Test
That worked. I then dumped all my databases as shown in a previous section. Then I saved them all to CD.
Then I did the right thing:
# pkg_delete -f postgresql-7.0.3
# pkg_delete -f postgresql-7.1.3 # cd /usr/ports/databases/postgresql7
# make deinstall
# make install
Then I had to do the initdb manually (and I'm not sure if this is usually done automatically):
# su -l pgsql
$ initdb
This database system will be initialized with username "pgsql".
This user will own all the data files and must also own the server process.

Creating directory /usr/local/pgsql/data
Creating directory /usr/local/pgsql/data/base
Creating directory /usr/local/pgsql/data/global
Creating directory /usr/local/pgsql/data/pg_xlog
Creating template1 database in /usr/local/pgsql/data/base/1
DEBUG: database system was shut down at 2001-11-29 17:59:29 EST
DEBUG: CheckPoint record at (0, 8)
DEBUG: Redo record at (0, 8); Undo record at (0, 8); Shutdown TRUE
DEBUG: NextTransactionId: 514; NextOid: 16384
DEBUG: database system is in production state
Creating global relations in /usr/local/pgsql/data/global
DEBUG: database system was shut down at 2001-11-29 17:59:34 EST
DEBUG: CheckPoint record at (0, 108)
DEBUG: Redo record at (0, 108); Undo record at (0, 0); Shutdown TRUE
DEBUG: NextTransactionId: 514; NextOid: 17199
DEBUG: database system is in production state
Initializing pg_shadow.
Enabling unlimited row width for system tables.
Creating system views.
Loading pg_description.
Setting lastsysoid.
Vacuuming database.
Copying template1 to template0.

Success. You can now start the database server using:

/usr/local/bin/postmaster -D /usr/local/pgsql/data
or
/usr/local/bin/pg_ctl -D /usr/local/pgsql/data -l logfile start
$
Then I started the database server:
# /usr/local/etc/rc.d/010.pgsql.sh start
NOTE: in recent versions of PostgreSQL (e.g. 8.2), the command is:
# /usr/local/etc/rc.d/postgresql start
Note that this script had been sitting around from my previous install. It may not be the same name on your system, but it will be in the same directory.
Improving performance
If you find that a query isn't running fast enough, look at the situation and act accordingly. Here is an example I encountered when working on FreshSource.
I was looking for all the children of a particular element:
freshports=# select * from element where parent_id = 77340;
  id   |   name   | parent_id | directory_file_flag | status
-------+----------+-----------+---------------------+--------
 77341 | files    |     77340 | D                   | A
 77449 | Makefile |     77340 | F                   | A
 77450 | distinfo |     77340 | F                   | A
(3 rows)
freshports=# explain analyse select * from element where parent_id = 77340;
NOTICE: QUERY PLAN:

Seq Scan on element (cost=0.00..2165.41 rows=11 width=30) (actual time=548.68..655.47 rows=3 loops=1)
Total runtime: 655.59 msec
As you can see, this query is accomplished by doing a sequential scan on the element table and it takes 0.6s. Let's refresh the statistics on this table, and then run the query again.
freshports=# vacuum analyze element;
VACUUM

freshports=# explain analyse select * from element where parent_id = 77340;
NOTICE: QUERY PLAN:

Seq Scan on element (cost=0.00..2201.85 rows=12 width=30) (actual time=178.50..236.41 rows=3 loops=1)
Total runtime: 236.53 msec
That gets us down to 0.2s, but we are still doing a sequential scan. Let's try an index.
freshports=# create index element_parent_id on element(parent_id);
CREATE
freshports=# explain analyse select * from element where parent_id = 77340;
NOTICE: QUERY PLAN:

Index Scan using element_parent_id on element (cost=0.00..25.89 rows=12 width=30) (actual time=0.38..0.49 rows=3 loops=1)
Total runtime: 0.62 msec
OK, now that is impressive. We've gone from 600ms to 0.6ms. That's 1000 times faster overall. For more information, read the documentation regarding vacuum.

Useful NMAP commands for Sys/Network Admins

Nmap is short for Network Mapper. It is an open source security tool for network exploration, security scanning and auditing. However, nmap command comes with lots of options that can make the utility more robust and difficult to follow for new users.
The purpose of this post is to introduce a user to the nmap command line tool to scan a host and/or network, so to find out the possible vulnerable points in the hosts. You will also learn how to use Nmap for offensive and defensive purposes.
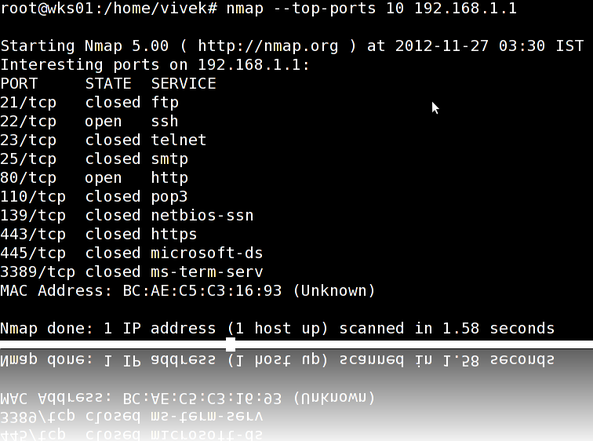
nmap in action
nmap in action

More about nmap

From the man page:
Nmap ("Network Mapper") is an open source tool for network exploration and security auditing. It was designed to rapidly scan large networks, although it works fine against single hosts. Nmap uses raw IP packets in novel ways to determine what hosts are available on the network, what services (application name and version) those hosts are offering, what operating systems (and OS versions) they are running, what type of packet filters/firewalls are in use, and dozens of other characteristics. While Nmap is commonly used for security audits, many systems and network administrators find it useful for routine tasks such as network inventory, managing service upgrade schedules, and monitoring host or service uptime.
It was originally written by Gordon Lyon and it can answer the following questions easily:
  1. What computers did you find running on the local network?
  2. What IP addresses did you find running on the local network?
  3. What is the operating system of your target machine?
  4. Find out what ports are open on the machine that you just scanned?
  5. Find out if the system is infected with malware or virus.
  6. Search for unauthorized servers or network service on your network.
  7. Find and remove computers which don't meet the organization's minimum level of security.

Sample setup (LAB)

Port scanning may be illegal in some jurisdictions. So setup a lab as follows:
                              +---------+
        +---------+           | Network |         +--------+
        | server1 |-----------+ swtich  +---------|server2 |
        +---------+           | (sw0)   |         +--------+
                              +----+----+
                                   |
                                   |
                         +---------+----------+
                         | wks01 Linux/OSX    |
                         +--------------------+
Where,
  • wks01 is your computer either running Linux/OS X or Unix like operating system. It is used for scanning your local network. The nmap command must be installed on this computer.
  • server1 can be powered by Linux / Unix / MS-Windows operating systems. This is an unpatched server. Feel free to install a few services such as a web-server, file server and so on.
  • server2 can be powered by Linux / Unix / MS-Windows operating systems. This is a fully patched server with firewall. Again, feel free to install few services such as a web-server, file server and so on.
  • All three systems are connected via switch.

How do I install nmap?

See:
  1. Debian / Ubuntu Linux: Install nmap Software For Scanning Network
  2. CentOS / RHEL: Install nmap Network Security Scanner
  3. OpenBSD: Install nmap Network Security Scanner

#1: Scan a single host or an IP address (IPv4)

### Scan a single ip address ###
nmap 192.168.1.1
 
## Scan a host name ###
nmap server1.cyberciti.biz
 
## Scan a host name with more info###
nmap -v server1.cyberciti.biz
 
Sample outputs:
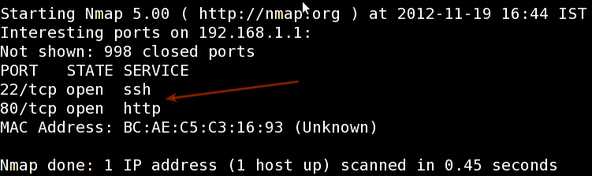
Fig.01: nmap output
Fig.01: nmap output

#2: Scan multiple IP address or subnet (IPv4)

nmap 192.168.1.1 192.168.1.2 192.168.1.3
## works with same subnet i.e. 192.168.1.0/24
nmap 192.168.1.1,2,3
You can scan a range of IP address too:
nmap 192.168.1.1-20
You can scan a range of IP address using a wildcard:
nmap 192.168.1.*
Finally, you scan an entire subnet:
nmap 192.168.1.0/24

#3: Read list of hosts/networks from a file (IPv4)

The -iL option allows you to read the list of target systems using a text file. This is useful to scan a large number of hosts/networks. Create a text file as follows:
cat > /tmp/test.txt
Sample outputs:
server1.cyberciti.biz
192.168.1.0/24
192.168.1.1/24
10.1.2.3
localhost
The syntax is:
nmap -iL /tmp/test.txt

#4: Excluding hosts/networks (IPv4)

When scanning a large number of hosts/networks you can exclude hosts from a scan:
nmap 192.168.1.0/24 --exclude 192.168.1.5
nmap 192.168.1.0/24 --exclude 192.168.1.5,192.168.1.254
OR exclude list from a file called /tmp/exclude.txt
nmap -iL /tmp/scanlist.txt --excludefile /tmp/exclude.txt

#5: Turn on OS and version detection scanning script (IPv4)

nmap -A 192.168.1.254
nmap -v -A 192.168.1.1
nmap -A -iL /tmp/scanlist.txt 

#6: Find out if a host/network is protected by a firewall

nmap -sA 192.168.1.254
nmap -sA server1.cyberciti.biz

#7: Scan a host when protected by the firewall

nmap -PN 192.168.1.1
nmap -PN server1.cyberciti.biz

#8: Scan an IPv6 host/address

The -6 option enable IPv6 scanning. The syntax is:
nmap -6 IPv6-Address-Here
nmap -6 server1.cyberciti.biz
nmap -6 2607:f0d0:1002:51::4
nmap -v A -6 2607:f0d0:1002:51::4

#9: Scan a network and find out which servers and devices are up and running

This is known as host discovery or ping scan:
nmap -sP 192.168.1.0/24
Sample outputs:
Host 192.168.1.1 is up (0.00035s latency).
MAC Address: BC:AE:C5:C3:16:93 (Unknown)
Host 192.168.1.2 is up (0.0038s latency).
MAC Address: 74:44:01:40:57:FB (Unknown)
Host 192.168.1.5 is up.
Host nas03 (192.168.1.12) is up (0.0091s latency).
MAC Address: 00:11:32:11:15:FC (Synology Incorporated)
Nmap done: 256 IP addresses (4 hosts up) scanned in 2.80 second

#10: How do I perform a fast scan?

nmap -F 192.168.1.1

#11: Display the reason a port is in a particular state

nmap --reason 192.168.1.1
nmap --reason server1.cyberciti.biz

#12: Only show open (or possibly open) ports

nmap --open 192.168.1.1
nmap --open server1.cyberciti.biz

#13: Show all packets sent and received

nmap --packet-trace 192.168.1.1
nmap --packet-trace server1.cyberciti.biz

14#: Show host interfaces and routes

This is useful for debugging (ip command or route command or netstat command like output using nmap)
nmap --iflist
Sample outputs:
Starting Nmap 5.00 ( http://nmap.org ) at 2012-11-27 02:01 IST
************************INTERFACES************************
DEV    (SHORT)  IP/MASK          TYPE        UP MAC
lo     (lo)     127.0.0.1/8      loopback    up
eth0   (eth0)   192.168.1.5/24   ethernet    up B8:AC:6F:65:31:E5
vmnet1 (vmnet1) 192.168.121.1/24 ethernet    up 00:50:56:C0:00:01
vmnet8 (vmnet8) 192.168.179.1/24 ethernet    up 00:50:56:C0:00:08
ppp0   (ppp0)   10.1.19.69/32    point2point up
 
**************************ROUTES**************************
DST/MASK         DEV    GATEWAY
10.0.31.178/32   ppp0
209.133.67.35/32 eth0   192.168.1.2
192.168.1.0/0    eth0
192.168.121.0/0  vmnet1
192.168.179.0/0  vmnet8
169.254.0.0/0    eth0
10.0.0.0/0       ppp0
0.0.0.0/0        eth0   192.168.1.2
 

#15: How do I scan specific ports?

map -p [port] hostName
## Scan port 80
nmap -p 80 192.168.1.1
 
## Scan TCP port 80
nmap -p T:80 192.168.1.1
 
## Scan UDP port 53
nmap -p U:53 192.168.1.1
 
## Scan two ports ##
nmap -p 80,443 192.168.1.1
 
## Scan port ranges ##
nmap -p 80-200 192.168.1.1
 
## Combine all options ##
nmap -p U:53,111,137,T:21-25,80,139,8080 192.168.1.1
nmap -p U:53,111,137,T:21-25,80,139,8080 server1.cyberciti.biz
nmap -v -sU -sT -p U:53,111,137,T:21-25,80,139,8080 192.168.1.254
 
## Scan all ports with * wildcard ##
nmap -p "*" 192.168.1.1
 
## Scan top ports i.e. scan $number most common ports ##
nmap --top-ports 5 192.168.1.1
nmap --top-ports 10 192.168.1.1
 
Sample outputs:
Starting Nmap 5.00 ( http://nmap.org ) at 2012-11-27 01:23 IST
Interesting ports on 192.168.1.1:
PORT     STATE  SERVICE
21/tcp   closed ftp
22/tcp   open   ssh
23/tcp   closed telnet
25/tcp   closed smtp
80/tcp   open   http
110/tcp  closed pop3
139/tcp  closed netbios-ssn
443/tcp  closed https
445/tcp  closed microsoft-ds
3389/tcp closed ms-term-serv
MAC Address: BC:AE:C5:C3:16:93 (Unknown)
 
Nmap done: 1 IP address (1 host up) scanned in 0.51 seconds
 

#16: The fastest way to scan all your devices/computers for open ports ever

nmap -T5 192.168.1.0/24

#17: How do I detect remote operating system?

 
nmap -O 192.168.1.1
nmap -O  --osscan-guess 192.168.1.1
nmap -v -O --osscan-guess 192.168.1.1
Sample outputs:
Starting Nmap 5.00 ( http://nmap.org ) at 2012-11-27 01:29 IST
NSE: Loaded 0 scripts for scanning.
Initiating ARP Ping Scan at 01:29
Scanning 192.168.1.1 [1 port]
Completed ARP Ping Scan at 01:29, 0.01s elapsed (1 total hosts)
Initiating Parallel DNS resolution of 1 host. at 01:29
Completed Parallel DNS resolution of 1 host. at 01:29, 0.22s elapsed
Initiating SYN Stealth Scan at 01:29
Scanning 192.168.1.1 [1000 ports]
Discovered open port 80/tcp on 192.168.1.1
Discovered open port 22/tcp on 192.168.1.1
Completed SYN Stealth Scan at 01:29, 0.16s elapsed (1000 total ports)
Initiating OS detection (try #1) against 192.168.1.1
Retrying OS detection (try #2) against 192.168.1.1
Retrying OS detection (try #3) against 192.168.1.1
Retrying OS detection (try #4) against 192.168.1.1
Retrying OS detection (try #5) against 192.168.1.1
Host 192.168.1.1 is up (0.00049s latency).
Interesting ports on 192.168.1.1:
Not shown: 998 closed ports
PORT   STATE SERVICE
22/tcp open  ssh
80/tcp open  http
MAC Address: BC:AE:C5:C3:16:93 (Unknown)
Device type: WAP|general purpose|router|printer|broadband router
Running (JUST GUESSING) : Linksys Linux 2.4.X (95%), Linux 2.4.X|2.6.X (94%), MikroTik RouterOS 3.X (92%), Lexmark embedded (90%), Enterasys embedded (89%), D-Link Linux 2.4.X (89%), Netgear Linux 2.4.X (89%)
Aggressive OS guesses: OpenWrt White Russian 0.9 (Linux 2.4.30) (95%), OpenWrt 0.9 - 7.09 (Linux 2.4.30 - 2.4.34) (94%), OpenWrt Kamikaze 7.09 (Linux 2.6.22) (94%), Linux 2.4.21 - 2.4.31 (likely embedded) (92%), Linux 2.6.15 - 2.6.23 (embedded) (92%), Linux 2.6.15 - 2.6.24 (92%), MikroTik RouterOS 3.0beta5 (92%), MikroTik RouterOS 3.17 (92%), Linux 2.6.24 (91%), Linux 2.6.22 (90%)
No exact OS matches for host (If you know what OS is running on it, see http://nmap.org/submit/ ).
TCP/IP fingerprint:
OS:SCAN(V=5.00%D=11/27%OT=22%CT=1%CU=30609%PV=Y%DS=1%G=Y%M=BCAEC5%TM=50B3CA
OS:4B%P=x86_64-unknown-linux-gnu)SEQ(SP=C8%GCD=1%ISR=CB%TI=Z%CI=Z%II=I%TS=7
OS:)OPS(O1=M2300ST11NW2%O2=M2300ST11NW2%O3=M2300NNT11NW2%O4=M2300ST11NW2%O5
OS:=M2300ST11NW2%O6=M2300ST11)WIN(W1=45E8%W2=45E8%W3=45E8%W4=45E8%W5=45E8%W
OS:6=45E8)ECN(R=Y%DF=Y%T=40%W=4600%O=M2300NNSNW2%CC=N%Q=)T1(R=Y%DF=Y%T=40%S
OS:=O%A=S+%F=AS%RD=0%Q=)T2(R=N)T3(R=N)T4(R=Y%DF=Y%T=40%W=0%S=A%A=Z%F=R%O=%R
OS:D=0%Q=)T5(R=Y%DF=Y%T=40%W=0%S=Z%A=S+%F=AR%O=%RD=0%Q=)T6(R=Y%DF=Y%T=40%W=
OS:0%S=A%A=Z%F=R%O=%RD=0%Q=)T7(R=N)U1(R=Y%DF=N%T=40%IPL=164%UN=0%RIPL=G%RID
OS:=G%RIPCK=G%RUCK=G%RUD=G)IE(R=Y%DFI=N%T=40%CD=S)
Uptime guess: 12.990 days (since Wed Nov 14 01:44:40 2012)
Network Distance: 1 hop
TCP Sequence Prediction: Difficulty=200 (Good luck!)
IP ID Sequence Generation: All zeros
Read data files from: /usr/share/nmap
OS detection performed. Please report any incorrect results at http://nmap.org/submit/ .
Nmap done: 1 IP address (1 host up) scanned in 12.38 seconds
           Raw packets sent: 1126 (53.832KB) | Rcvd: 1066 (46.100KB)
See also: Fingerprinting a web-server and a dns server command line tools for more information.

#18: How do I detect remote services (server / daemon) version numbers?

nmap -sV 192.168.1.1
Sample outputs:
Starting Nmap 5.00 ( http://nmap.org ) at 2012-11-27 01:34 IST
Interesting ports on 192.168.1.1:
Not shown: 998 closed ports
PORT   STATE SERVICE VERSION
22/tcp open  ssh     Dropbear sshd 0.52 (protocol 2.0)
80/tcp open  http?
1 service unrecognized despite returning data.

#19: Scan a host using TCP ACK (PA) and TCP Syn (PS) ping

If firewall is blocking standard ICMP pings, try the following host discovery methods:
nmap -PS 192.168.1.1
nmap -PS 80,21,443 192.168.1.1
nmap -PA 192.168.1.1
nmap -PA 80,21,200-512 192.168.1.1

#20: Scan a host using IP protocol ping

nmap -PO 192.168.1.1

#21: Scan a host using UDP ping

This scan bypasses firewalls and filters that only screen TCP:
nmap -PU 192.168.1.1
nmap -PU 2000.2001 192.168.1.1

#22: Find out the most commonly used TCP ports using TCP SYN Scan

 
### Stealthy scan ###
nmap -sS 192.168.1.1
 
### Find out the most commonly used TCP ports using  TCP connect scan (warning: no stealth scan)
###  OS Fingerprinting ###
nmap -sT 192.168.1.1
 
### Find out the most commonly used TCP ports using TCP ACK scan
nmap -sA 192.168.1.1
 
### Find out the most commonly used TCP ports using TCP Window scan
nmap -sW 192.168.1.1
 
### Find out the most commonly used TCP ports using TCP Maimon scan
nmap -sM 192.168.1.1
 

#23: Scan a host for UDP services (UDP scan)

Most popular services on the Internet run over the TCP protocol. DNS, SNMP, and DHCP are three of the most common UDP services. Use the following syntax to find out UDP services:
nmap -sU nas03
nmap -sU 192.168.1.1
Sample outputs:
 
Starting Nmap 5.00 ( http://nmap.org ) at 2012-11-27 00:52 IST
Stats: 0:05:29 elapsed; 0 hosts completed (1 up), 1 undergoing UDP Scan
UDP Scan Timing: About 32.49% done; ETC: 01:09 (0:11:26 remaining)
Interesting ports on nas03 (192.168.1.12):
Not shown: 995 closed ports
PORT     STATE         SERVICE
111/udp  open|filtered rpcbind
123/udp  open|filtered ntp
161/udp  open|filtered snmp
2049/udp open|filtered nfs
5353/udp open|filtered zeroconf
MAC Address: 00:11:32:11:15:FC (Synology Incorporated)
 
Nmap done: 1 IP address (1 host up) scanned in 1099.55 seconds
 

#24: Scan for IP protocol

This type of scan allows you to determine which IP protocols (TCP, ICMP, IGMP, etc.) are supported by target machines:
nmap -sO 192.168.1.1

#25: Scan a firewall for security weakness

The following scan types exploit a subtle loophole in the TCP and good for testing security of common attacks:
 
## TCP Null Scan to fool a firewall to generate a response ##
## Does not set any bits (TCP flag header is 0) ##
nmap -sN 192.168.1.254
 
## TCP Fin scan to check firewall ##
## Sets just the TCP FIN bit ##
nmap -sF 192.168.1.254
 
## TCP Xmas scan to check firewall ##
## Sets the FIN, PSH, and URG flags, lighting the packet up like a Christmas tree ##
nmap -sX 192.168.1.254
 

#26: Scan a firewall for packets fragments

The -f option causes the requested scan (including ping scans) to use tiny fragmented IP packets. The idea is to split up the TCP header over
several packets to make it harder for packet filters, intrusion detection systems, and other annoyances to detect what you are doing.
nmap -f 192.168.1.1
nmap -f fw2.nixcraft.net.in
nmap -f 15 fw2.nixcraft.net.in
## Set your own offset size with the --mtu option ##
nmap --mtu 32 192.168.1.1

#27: Cloak a scan with decoys

The -D option it appear to the remote host that the host(s) you specify as decoys are scanning the target network too. Thus their IDS might report 5-10 port scans from unique IP addresses, but they won't know which IP was scanning them and which were innocent decoys:
nmap -n -Ddecoy-ip1,decoy-ip2,your-own-ip,decoy-ip3,decoy-ip4 remote-host-ip
nmap -n -D192.168.1.5,10.5.1.2,172.1.2.4,3.4.2.1 192.168.1.5

#28: Scan a firewall for MAC address spoofing

 
### Spoof your MAC address ##
nmap --spoof-mac MAC-ADDRESS-HERE 192.168.1.1
 
### Add other options ###
nmap -v -sT -PN --spoof-mac MAC-ADDRESS-HERE 192.168.1.1
 
 
### Use a random MAC address ###
### The number 0, means nmap chooses a completely random MAC address ###
nmap -v -sT -PN --spoof-mac 0 192.168.1.1
 

#29: How do I save output to a text file?

The syntax is:
nmap 192.168.1.1 > output.txt
nmap -oN /path/to/filename 192.168.1.1
nmap -oN output.txt 192.168.1.1

#30: Not a fan of command line tools?

Zenmap is the official Nmap Security Scanner GUI. It is a multi-platform (Linux, Windows, Mac OS X, BSD, etc.) free and open source application which aims to make Nmap easy for beginners to use while providing advanced features for experienced Nmap users. Frequently used scans can be saved as profiles to make them easy to run repeatedly. A command creator allows interactive creation of Nmap command lines. Scan results can be saved and viewed later. Saved scan results can be compared with one another to see how they differ. The results of recent scans are stored in a searchable database.
You can install zenmap using the following apt-get command:
$ sudo apt-get install zenmap
Sample outputs:
[sudo] password for vivek:
Reading package lists... Done
Building dependency tree
Reading state information... Done
The following NEW packages will be installed:
  zenmap
0 upgraded, 1 newly installed, 0 to remove and 11 not upgraded.
Need to get 616 kB of archives.
After this operation, 1,827 kB of additional disk space will be used.
Get:1 http://debian.osuosl.org/debian/ squeeze/main zenmap amd64 5.00-3 [616 kB]
Fetched 616 kB in 3s (199 kB/s)
Selecting previously deselected package zenmap.
(Reading database ... 281105 files and directories currently installed.)
Unpacking zenmap (from .../zenmap_5.00-3_amd64.deb) ...
Processing triggers for desktop-file-utils ...
Processing triggers for gnome-menus ...
Processing triggers for man-db ...
Setting up zenmap (5.00-3) ...
Processing triggers for python-central ...
Type the following command to start zenmap:
$ sudo zenmap
Sample outputs
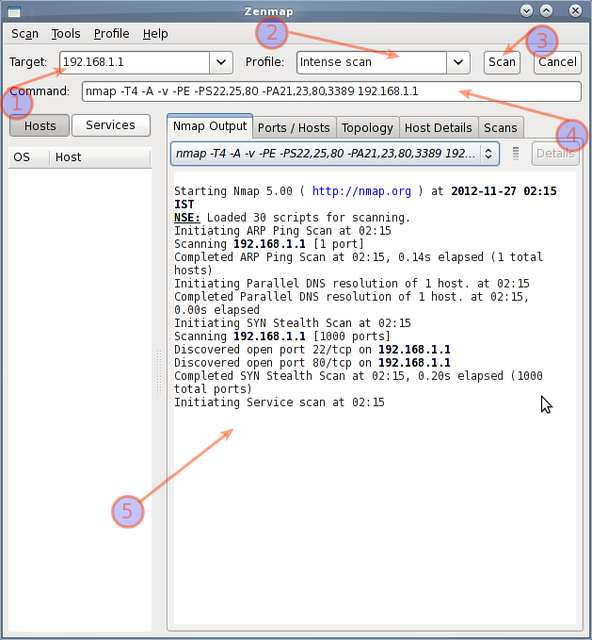
Fig.02: zenmap in action

How do I detect and block port scanning?

Try the following resources:
  1. How to use psad tool to detect and block port scan attacks in real time.
  2. Debian / Ubuntu Linux: Install and Configure Shoreline Firewall (Shorewall).
  3. CentOS / Redhat Iptables Firewall Configuration Tutorial.
  4. Linux: 20 Iptables Examples For New SysAdmins.
  5. 20 Linux Server Hardening Security Tips.
REFERENCES:
The nmap command has many more options, please go through man page or the documentation for more information. What are some of your favorite nmap command-line tricks? Share your favorite tips, tricks, and advice in the comments below.