Showing posts with label Security. Show all posts

Wednesday, January 21, 2015

Some Open Source Cloud Storage Software For Your Security ad Privacy


Cloud storage is nothing but an enterprise-level cloud data storage model to store the digital data in logical pools, across the multiple servers. You can use a hosting company such as Amazon, Google, Rackspace, Dropbox and others for keeping your data available and accessible 24x7. You can access data stored on cloud storage via API or desktop/mobile apps or web based systems.
In this post, I'm going to list amazingly awesome open source cloud storage engines that you can use to access and sync your data privately for security and privacy reasons.

Why use open source cloud storage software?
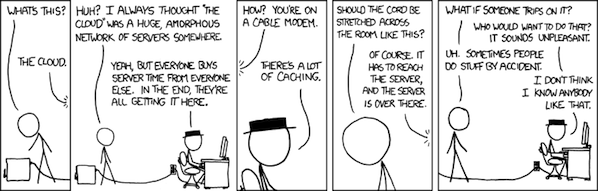
The cloud - Source http://www.xkcd.net/908/
  1. Create a cloud on your own server or in a data center.
  2. Control and own your own data.
  3. Privacy protection.
  4. Encryption.
  5. Verify source code for bugs and/or backdoors.
  6. Avoid spying on your files on the server using encryption.
  7. Legal compliance - HIPAA and others.
  8. Good performance as your data stored in local storage instead of remote data center.
  9. Good reliability and availability due to local LAN. You are no longer depends upon WAN bandwidth or the service provider for network.
  10. No artificially imposed limits on storage space or client connections and more
  11. Share your files and data with or without password or time limit. Share it publicly, or privately. No 3rd party corporation own your data.

Suggested sample cloud storage setup for home users

                      +----------------+
      Internet/ISP----|Router/Wireless |
                      +----+-----------+
                           |
                      +----+---+
                      |Home Lan|
                      +--------+       +-------------------+
                               |       | Raspberry Pi      |
                               +-------+  Or Intel         |
                                       | Atom based server |
                                       |        +          |
                                       | Cloud storage     |
                                       +-------------------+
You can use the Raspberry Pi or an Intel Atom CPU based small server as a home cloud storage system. Use an external USB drive or secure backup service such as rsync.net/tarsnap.com to backup your cloud server in an encrypted format. This setup ensures that you keep all your data and not to trust the entirety of your personal data to a corporation.

Seafile: Easy to setup cloud storage for home users

Seafile is a file hosting cloud storage software to store files. You can synchronized files and data with PC and mobile devices easily or use the server's web interface for managing your data files. There is no limits on data storage space (except for hard disk capacity) or the number of connected clients to your private server (except for CPU/RAM capacity).
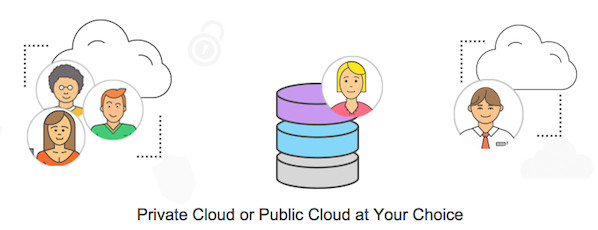
Seafile cloud storage
Operating system: Cross-platform (written in C and Python) - MS-Windows/Raspberry Pi/Linux private server
Desktop clients: Yes (Windows/Mac OS X/Linux)
Mobile clients: Yes (Android/iPad/iPhone)
Type: File cloud storage and data synchronization
Paid support: Yes via Professional Edition
Licence: GPLv3 (Community Edition)
Download: seafile.com

ownCloud: Dropbox replacement

ownCloud is another very popular file hosting cloud storage software and often described as Dropbox replacement. Just like Dropbox you can synchronizes your files to your private server. Files placed in ownCloud server are accessible via the mobile and desktop apps. You can add external storage to your ownCloud with Dropbox, SWIFT, FTPs, Google Docs, S3, external WebDAV servers and more. Enable the encryption app to encrypt data on external storage for improved security and privacy.
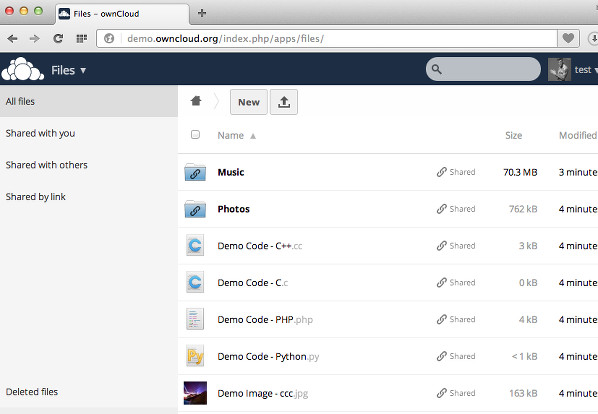
owncloud  web client
Operating system: Cross-platform (written in PHP & JavaScript) - MS-Windows/Linux private server
Desktop clients: Yes (Windows/Mac OS X/Linux)
Mobile clients: Yes (Android/Apple iOS)
Type: File cloud storage and data synchronization
Paid support: Yes via Enterprise Edition
Licence: AGPLv3
Download: owncloud.org

git-annex assistant

The git-annex assistant creates a synchronised folder on each of your OSX and Linux computers, Android devices, removable drives, NAS appliances, and cloud services. You can manage, share, and sync your large files with the power of git and the ease of use of a simple folder you drop files into. Please note that the software is still under heavy development and new features are added regularly.
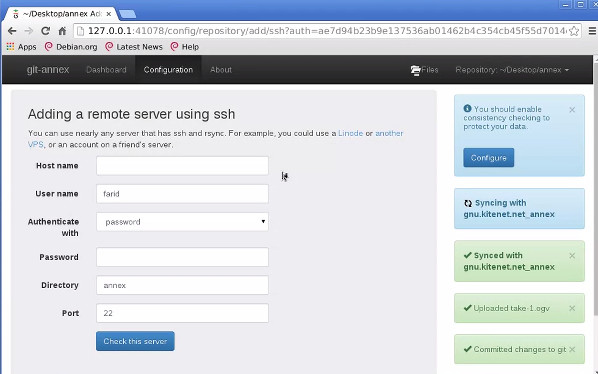
git-cloud-storage
Operating system: Cross-platform - MS-Windows(beta)/Linux/OS X/FreeBSD/Docker private server
Desktop clients: No (porting)
Mobile clients: Yes (Android)
Type: File cloud storage and data synchronization
Paid support: ???
Licence: GPL version 3
Download: git-annex.branchable.com

SparkleShare: Easy to use cloud storage with git as a storage backend

It is also a Dropbox clone and very easy to setup. From the project site:
SparkleShare creates a special folder on your computer. You can add remotely hosted folders (or "projects") to this folder. These projects will be automatically kept in sync with both the host and all of your peers when someone adds, removes or edits a file.
sparkleshare
Operating system: Cross-platform (written in C#) - MS-Windows/Linux/OS X
Desktop clients: Yes ( MS-Windows/Linux/OS X)
Mobile clients: No (Android/iOS on hold)
Type: File and data synchronization
Paid support: ???
Licence: GPL version 3
Download: sparkleshare.org

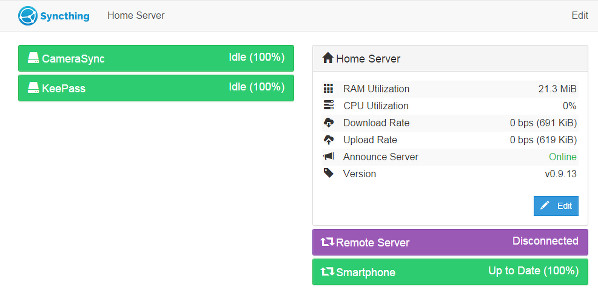
Syncthing for private, encrypted & authenticated distribution of data

Syncthing is an open-source file synchronization client/server application, written in Go. It replaces proprietary sync and cloud services with something open, trustworthy and decentralized.
SyncthingWebInterface-1
Operating system: Cross-platform (written in Go) - Linux, Mac OS X, Microsoft Windows, Android, BSD, Solaris
Desktop clients: Yes (MS-Windows/Linux/OS X/OpeBSD and Unix-like)
Mobile clients: Yes (Android/F-Driod)
Type: File and data synchronization
Paid support: ???
Licence: GPL version 3
Download: syncthing.net

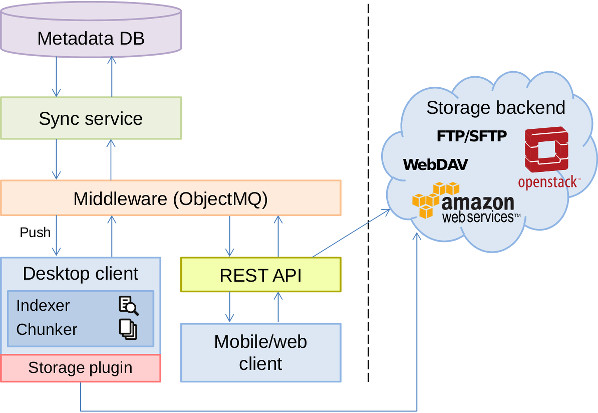
Stacksync cloud storage

StackSync is an open-source scalable Personal Cloud that can adapt to the necessities of organizations. It puts a special emphasis on security by encrypting data on the client side before it is sent to the server.
stacksync
Operating system: Linux
Desktop clients: Yes (MS-Windows/Linux/)
Mobile clients: Yes (Android)
Type: File and data synchronization
Paid support: ???
Licence: GPL version 2
Download: stacksync.org

OpenStack Object Storage (Swift)

Swift is a scalable redundant storage system. Objects and files are written to multiple disk drives spread throughout servers in the data center, with the OpenStack software responsible for ensuring data replication and integrity across the cluster. Please note that Swift is meant for a large or enterprise users only and not recommended for home users due to complex setup procedures.
Operating system: Cross-platform (written in Python)
Desktop clients: ???
Mobile clients: ???
Type: File, data synchronization and more
Paid support: ???
Licence: Apache License 2.0
Download: openstack.org

Conclusion

Personally, I'm using Owncloud as FOSS based cloud solution for my file sharing with friends and family. It offers me Calendar, Contacts, and Dropbox like storage. My cloud server has total 5 disks, 2 Gib RAM, and an Intel atom cpu. I use a Debian Linux with RAID 6. I backup my cloud to an external USB drive and currently, testing tarsanp backup service. I'm also planning to try out SparkleShare on the Raspberry Pi soon.

Friday, January 16, 2015

Vulnerability Scanning: Wordpress Security

WordPress is one of the best and most popular content management system (CMS) among bloggers and there are a lot of bloggers using WordPress as a CMS. Wordpress is on the hit list of the hackers and spammers, spammers use their malware to compromise a wordpress website that is why reverse engineering of malware is necessary.

However there are other CMS available, like Joomla!, but WordPress has its own importance and market. Since most bloggers are using WordPress the security is also important and a single dangerous vulnerability may lead to thousands of compromised WordPress blogs. From the penetration tester point-of-view an administrator must be aware at the system level, as well as the application level, of existing vulnerabilities in order to protect these website(s).

A quick tip to secure a WordPress (or any other) blog from the system/server software vulnerability is by auditing. This includes keeping up-to-date all the server’s software, browsers, anti-virus, using strong passwords and changing them very often, scanning the server for malware and backdoors, using firewalls, etc.,. WordPress software itself has different vulnerabilities; in fact security researchers discover new vulnerabilities on a daily basis.

So in this article we will cover some tools and plug-ins to audit WordPress software for security holes and vulnerabilities. We will also discuss the possible ways and tools that an attacker might use to hack into WordPress, and some of the best way(s) to secure a WordPress blog.

WordPress Security Audit & Vulnerability Scanning

A security audit is one of the most important steps to finding possible vulnerabilities in WordPress and in this section I will discuss some tools and plug-ins you can use to find them.

Plecost WordPress Fingerprinting Tool:

Plecost is a wonderful tool to audit a WordPress blog and it is available by default on the most famous penetration test tools i.e., Backtrack, Backbox and Blackbuntu. Plecost contains a database of available plug-ins and compares them against the common vulnerability and exposure (CVE) list to verify its vulnerability on WordPress.
Plecost can work in two modes – either by auditing the security of a single targeted URL or Google search results. Our goal is to audit a single URL.


Here is the result of a quick and a simple audit on WordPress using Plecost.

root@bt:/pentest/web/scanners/plecost# ./plecost-0.2.2-9-beta.py -i wp_plugin_list.txt -c http://127.0.0.1/wordpress

-------------------------------------------------

[*] Input plugin list set to: wp_plugin_list.txt

[*] Colored output set on.

-------------------------------------------------

==> Results for: http://127.0.0.1/wordpress <==

[i] WordPress version found: 3.3

[i] WordPress last public version: 3.3.1

[*] Search for installed plugins

[i] Plugin found: akismet

|_Latest version: 2.4.0

|_ Installed version: 2.3.0

|_CVE list:

|___CVE-2009-2334: (http://cve.mitre.org/cgi-bin/cvename.cgi?name=CVE-2009-2334)

|___CVE-2007-2714: (http://cve.mitre.org/cgi-bin/cvename.cgi?name=CVE-2007-2714)

|___CVE-2006-4743: (http://cve.mitre.org/cgi-bin/cvename.cgi?name=CVE-2006-4743)

|___CVE-2009-2334: (http://cve.mitre.org/cgi-bin/cvename.cgi?name=CVE-2009-2334)

|___CVE-2007-2714: (http://cve.mitre.org/cgi-bin/cvename.cgi?name=CVE-2007-2714)

|___CVE-2006-4743: (http://cve.mitre.org/cgi-bin/cvename.cgi?name=CVE-2006-4743)

[i] Plugin found: wp-security-scan

|_Latest version: 2.7.1.2

|_ Installed version: trunk

|_CVE list:

|___CVE-2009-2334: (http://cve.mitre.org/cgi-bin/cvename.cgi?name=CVE-2009-2334)

|___CVE-2009-2334: (http://cve.mitre.org/cgi-bin/cvename.cgi?name=CVE-2009-2334)

You can see that this WordPress software is outdated. The new version of WordPress is available and the new version of the plug-ins are also available, but they have not been updated.

Wednesday, January 7, 2015

5 Steps Wifi Hacking – Cracking WPA2 Password

After the long holiday, first I want to say Merry Christmas and Happy new year 2014 to you. Today we will learn about 5 Steps Wifi Hacking – Cracking WPA2 Password. A lot of readers send many request regarding how to crack wireless WPA2 password in our request tutorial page.
According to Wikipedia :
Wi-Fi Protected Access (WPA) and Wi-Fi Protected Access II (WPA2) are two security protocols and security certification programs developed by the Wi-Fi Alliance to secure wireless computer networks. The Alliance defined these in response to serious weaknesses researchers had found in the previous system, WEP (Wired Equivalent Privacy)
A flaw in a feature added to Wi-Fi, called Wi-Fi Protected Setup (WPS), allows WPA and WPA2 security to be bypassed and effectively broken in many situations. Many access point they have a Wifi Protected Setup enabled by default (even after we hard reset the access point).
Requirements:

1. Wireless card (support promiscuous mode)
In this tutorial I use ALFA AWUS036H from Amazon.

2. Access point with WPA2 and WPS enables


5 Steps Wifi Hacking – Cracking WPA2 Password:

1. Open our terminal (CTRL+ALT+T) and type airmon-ng - this command will lists our wireless card that attached with our system.

2. The next step we need to stop our wireless monitor mode by running airmon-ng stop wlan0

3. Now we ready to capture the wireless traffic around us. By running airodump-ng wlan0 our wireless interface will start capturing the data.

From the picture above, we can see many available access point with all the information. In the green box is our victim access point which is my own access point :-)

Information:
BSSID (Basic Service Set Identification): the MAC address of access point
PWR: Signal level reported by the card.
Beacons: Number of announcements packets sent by the AP
#Data: Number of captured data packets (if WEP, unique IV count), including data broadcast packets.
#/s: Number of data packets per second measure over the last 10 seconds.
CH: Channel number (taken from beacon packets).
MB: Maximum speed supported by the AP. If MB = 11, it's 802.11b, if MB = 22 it's 802.11b+ and higher rates are 802.11g.
ENC: Encryption algorithm in use.
CIPHER: The cipher detected. TKIP is typically used with WPA and CCMP is typically used with WPA2.
AUTH: The authentication protocol used.
ESSID: Shows the wireless network name. The so-called “SSID”, which can be empty if SSID hiding is activated.

4. From the step 3 above, we can find access point with encryption algorithm WPA2 and note the AP channel number. Now we will find out whether target AP has WPS enabled or not.
wash -i wlan0 -c 8 -C -s

If the WPS Locked status is No, then we ready to crack and move to step 5.

5. The last step is cracking the WPA2 password using reaver.
reaver -i <your_interface> -b <wi-fi victim MAC address> –fail-wait=360
Because we already get the information from step 3 above, so my command look like this:
reaver -i wlan0 -b E0:05:C5:5A:26:94 –fail-wait=360


it took about 5 hours to crack 19 characters WPA2 password (vishnuvalentino.com) from my Kali virtualBox, but it depend with our hardware and wireless card.

Conclusions:
1. WPA and WPA2 security implemented without using the Wi-Fi Protected Setup (WPS) feature are unaffected by the security vulnerability.
2. To prevent this attack, just turn off our WPS/QSS feature on our access point. See picture below (I only have the Chinese version :-P )

Notes: Only practice this tutorial on your own lab and your own device.Hacking can be a crime if you don't know where to put it.
f

How to use Keyloggers and Download Ardamax v3.0 Keylogger

Hello, In my last article "What are Keyloggers ( A Hacking Tool )". I explain all basic info about Key-loggers. Hope You read that article before this one. Because there i have explian its meaning and working.

NOTE : i am explaining these tutorials only  for educational purpose. Because before knowing the Security....You should understand all Hacking methods...and the author will not be liable for anything.

How Hackers use keyloggers to Hack passwords ?

Keylogger is a hardware device or a software program that records the real time activity of a computer user including the keyboard keys they press,as i explain in my last artilce. These keyloggers allow not only keyboard keystrokes to be captured but also are often capable of collecting screen captures from the computer. The keys they press are programmed to automatically transmit data over the network to a remote computer or Web server.

I am Going to explain the Hack using ARDAMAX KEYLOGGER. Because its best for Remote pc hacking. Here you just have to create a virus keylogger file and put that virus in victim's pc.Thats it !

DOWNLOAD ARDAMAX v3.0

After download ,Just install it..as a normal software. (Note : May be your  antivirus will not allow you to install this tool,or will show it as a Virus.Thats only because this a hacking tool. Not harful to your pc.) So lets start under an Assumption that u’ve installed Ardamax on ur computer.

1.) After installing the program, when you will run it for the first time, It may be ask for registration/serial key.I have provide the key in same file that you have download.So,enter the key and register it.

2.) After activating it, lets open it up. When you’ll open it, you’ll see an icon added into your system tray as shown in pic below.


3.)  Now lets right click on that icon & then click on “Remote Installation”. Now you should have something as shown in pic below


4.) Lets click on next and make sure that u should have the picture as below. In the option that says “Additional components” select ONLY “Log viewer”.


5.)  Now next screen would give you “Invisibility” options. This will help you to hide your key logger from your victim’s computer. So CHECK’EM all !


6.) Now next screen says “Security”, i personally don’t find it useful so you may just click on NEXT.


7.) Now the page that says “Web Update”, lets UNCHECK all off the boxes & click on NEXT.Web Update may fail your hack process.


8.)  Now you will see “Options” page. So select it the way i’ve done in the picture shown below.Hope my language is easy to understand for all ICA beginners.


9.)  Now here comes the most important page, which will show u the options and will let u select the way you want to receive the information from your victim’s computer.

You will have 3 options to receive victim’s info. I personally think that Email and network wouldn’t give u good performance. Lets select ONLY FTP, and rest of the information is already put in. So no need to change anything else.


What are ftp accounts ?

You will need to sign up with some free web hosting website. Which will give u some free web space and an FTP account. So this program will send all the information to your FTP account.That needed just to store data on net automatically from victim's pc.


10.) Now you should get a screen as shown in picture below where you’ll have to fill up your FTP details, so it can send information on it.
Here you have to enter your ftp hostname,username and its password.

11.) Once you’ve put the information, click on “test” button to check if it can connect it. And if its successful then u should get a msg like shown below.

12.) Now you’ll get “control” page, let it be the way it is and click NEXT

13.) Now you’ll get an option for “Screen shot”, which will send you screen shot of your victim’s computer. So adjust it as per your requirement and click NEXT.

14.)  Now you should see a page which will let you generate your keylogger’s file. So save it anywhere  u want but MAKE IT SURE U DON’T OPEN IT. You can change icon as well.


What to do with this Generated Remote Keylogger File ?
What you need to do now is,  open this file on any computer u wanna hack (If you have physical access). Or  send this file to your victim via email,or any trick and let him open it and start enjoy ! when you send your keylogger to your victim, his anti virus may also detect it as a virus. So now its on you to convince him.Because once he/she will click this file,The keylogger will automatically intalled in his/her computer,withou showing any process or window.And will always work in hidden mode,even he restart the pc.This way,you will get all his data  he pressed on his keyboard with screenshots ,to your ftp account...which you mention duirng the making of this virus.

Now at last Problem is this,If your Victim having Good antivirus or he is not recommending to turn off his Antivirus ,Just to test the file you send him,Then what to Do ? How to hack him ? How to make him Fool ?

There is Small Solution : Crypter and Binder .

Crypter : It encrypt the virus,So that antivirus will not able to detect it.But as i Explain that most antivirus becomes Too advance and providing latest virus updates daily.So its little bit difficult to bypass the antivirus.

Binder   : It Binds to files Together,Like a image "Jpeg" with a "Exe" Setup. Or two "Exe". This method is used to make fool your victim and convince him to click your Remote keylogger file.

What Is A Proxy Server And How To Use It for Security

Lets start, Proxies are store-and-forward caches. When you configure your web browser to use a proxy, it never connects to the URL. Instead, it always connects to the proxy server, and asks it to get the URL for you. Proxies can be used as a sort of firewall, because it isolates you from connecting to the Internet. When you use a proxy server, your computer will send a request to the proxy server, then the proxy server will send it to the destination (for example a website), the destination will answer the request the proxy has sent and finally the proxy will return the data to you computer. For example when you visit www.cyberarmy.in via proxy, it looks like this:


Why should you use proxy servers ?
    * Using proxy server you can bypass security/ parental controls.
    * To scan transmitted content before delivery for malware.
    * Proxy server is able to increase or decrease the speed of your connection to the Internet depending on the location of the prox.
    * Proxy server ( but only anonymous) can hide your IP address (the resource you visit will retrieve the IP of the proxy, and not your.
    * Proxy servers can help in case some owner of an Internet resource impose restrictions for users from certain countries ( for example hulu.com is only reserved for those from United States, if you are not from United States, you can’t watch videos on hulu.com)


How to use a proxy server ?

It is simple, just follow these instructions for Internet Explorer

1. Open Internet Explorer

2. In the Menu bar, select Tools, then Internet Options

3. After that click the Connection tab

4. In the Connection tab, on the bottom , you will find LAN settings;

5. In LAN tab, check "Use a proxy server for your LAN (These settings will not apply to dial-up or or VPN connections)", in Address add the IP Addresses of the proxy you would like to use, and add Port, and finally click OK. It looks like this:

In this example i am using an anonymous proxy server from United Kingdom with this IP address: 64.66.192.61 and port 80.

The same is for Mozilla Firefox

1. Open Mozilla Firefox

2. In Menu bar, select Tools, then Options…

3. After this will appear Options window, click Advanced tab

4. In Advanced tab, you will find Settings, click it

5. In Settings tab, check Manually proxy configuration, in HTTP Proxy add IP addresses from proxy server, and add Port, you can also set sites where you wont't use proxy server. For Example if you are from Germany, no sense to use a proxy server for German sites.
In the end click Ok;

I used the same proxy server(therefore the same address) also for Mozilla.

Instructions for Netscape:

1. Select the Tools Menu
2. Select Options
3. Select General
4. Select Connection Settings...
5. Check Manual Proxy Configuration
6. Enter the proxy server's IP address in the HTTP Proxy field and the proxy's port into the Port field.
7. OK your way out

Instructions for Opera

1. Select the Tools Menu
2. Select Preferences
3. Select Advanced Tab
4. Select Proxy Servers
5. Check the box next to HTTP
6. Enter the proxy server's IP address in the first box and the proxy's port in the box after "Port"
7. OK your way out

What is TCP/IP & UDP Attacks

Hello, Lets explain "TCP/IP & UDP Attacks", Most common and effective Web attacks...Lets Know abt its basic and types...

TCP/IP Attacks

1. TCP SYN or TCP ACK Flood Attack
2. TCP Sequence Number Attack
3. TCP/IP

UDP attacks

1. ICMP Attacks
2. Smurf Attacks
3. ICMP Tunneling

TCP operates using synchronized connections. The synchronization is vulnerable to attack; this is probably the most common attack used today. The synchronization or handshake, process initiates a TCP connection. This handshake is particularly vulnerable to a DoS attack referred to as the TCP SYN Flood attack. The process is also susceptible to access and modification attacks, which are briefly explained in the following sections.

TCP SYN or TCP ACK Flood Attack - This attack is very common... The purpose of this attack is to deny service. The attack begins as a normal TCP connection: the client and the server exchange information in TCP packets. The TCP client continues to send ACK packets to the server, these ACK packets tells the server that a connection is requested. The server thus responds to the client with a ACK packet, the client is supposed to respond with another packet accepting the connection to establish the session. In this attack the client continually send and receives the ACK packets but it does not open the session. The server holds these sessions open, awaiting the final packet in the sequence. This cause the server to fill up the available connections and denies any requesting clients access.

TCP Sequence Number Attack - This is when the attacker takes control of one end of a TCP session. The goal of this attack is to kick the attacked end of the network
for the duration of the session. Only then will the attack be successful. Each time a TCP message is sent the client or the server generates a sequence number. The attacker intercepts and then responds with a sequence number similar to the one used in the original session. This attack can then hijack or disrupt a session. If a valid sequence number is guessed the attacker can place himself between the client and the server. The attacker gains the connection and the data from the legitimate system. The only defense of such an attack is to know that its occurring... There is little that can be done...

TCP Hijacking - This is also called active sniffing, it involves the attacker gaining access to a host in the network and logically disconnecting it from the network. The attacker then inserts another machine with the same IP address. This happens quickly and gives the attacker access to the session and to all the information on the original system.

UDP packets aren't connection oriented and don't require the synchronization process as with TCP. UDP packets, however, are susceptible to interception, thus it can be attacked. UDP, like TCP, doesn't check the validity of an IP address. The nature of this layer is to trust the layer above it (I'm referring to the IP layer). The most common UDP attacks involve UDP flooding. UDP flooding overloads services, networks, and servers. Large streams of UDP packets are focused at a target, causing UDP services on that host to shut down. It can also overload the network and cause a DoS situation to occur.

ICMP Attacks - This occur by triggering a response from the ICMP protocol when it responds to a seemingly legitimate request (think of it as echoing). Ping for instance, that uses the ICMP protocol. sPing is a good example of this type of attack, it overloads te server with more bytes than it can handle, larger connections. Its ping flood.

Smurf Attacks - This attack uses IP spoofing and broadcasting to send a ping to a group of hosts on a network. When a host is pinged it send back ICMP message traffic information indicating status to the originator. If a broadcast is sent to network, all hosts will answer back to the ping. The result is an overload of network and the target system. The only way to prevent this attack is to prohibit ICMP traffic on the router.

ICMP Tunneling - ICMP can contain data about timing and routes. A packet can be used to hold information that is different from the intended information. This allows an ICMP packet to be used as a communications channel between two systems. The channel can be used to send a Trojan horse or other malicious packet. The counter measure is to deny ICMP traffic on your network.

Warning : ICMP can be very dangerous..and Even,as i said ...Don't try such attack from your pc,untill you don't know that how to be invisible on net ! Beccause once you get traced out ...No one can help you from Troubles..

Thankyou