Two factor authentication is increasingly becoming a strongly recommended way of protecting user accounts in web applications from attackers by requiring a second method of authentication in addition to the standard username and password pair.
Although two factor authentication can encompass a wide range of techniques like biometrics or smart cards, the most commonly deployed technique in web applications is the one time password. If you have used applications like Gmail, you are probably familiar with the one time password generated by the Google Authenticator app that's available on iOS or Android devices.
The algorithm used for the one time password in the Google Authenticator app is known as the Time-based One-Time Password (TOTP) algorithm. The TOTP algorithm is a standard algorithm approved by the IETF in (RFC 6238) totp-rfc.
Prerequisites
You need to download Google Authenticator app that generates 2-step verification codes on your phone or desktop. Install Google Authenticator before you install anything else on your Android device/iPhone/iPad/BlackBerry/Firefox devices.
Install Google Authenticator on a Fedora Linux
It is a little known fact that you can use the TOTP algorithm to secure your user accounts in Linux systems. This article will walk you through the steps necessary. While the exact commands will be for Fedora 20, the TOTP algorithm can be deployed to any Linux distro with a little modification.
TOTP can be configured on Linux systems with a simple PAM that Google released. Installing it on Fedora is simple. Simply run the following yum command:
yum install google-authenticator

## OR ##

sudo yum install google-authenticator
Configure Google Authenticator on a Fedora Linux
Next, run the following command with the user you want to enable two factor authenticator for:
google-authenticator
You will be prompted for some configurations. Scan the QRcode that appears with the Google Authenticator app:
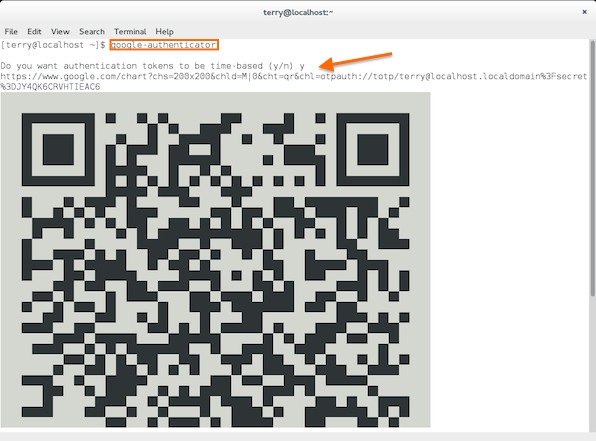
Fig.01: Google Authenticator app qr code for Linux
Save the backup codes listed somewhere safe. They will allow you to regain access if you lose your phone with the Authenticator app:

Fig.02: Google Authenticator Backup codes for Linux
Unless you have a good reason to, the defaults presented are sane. Just enter "y" for them:
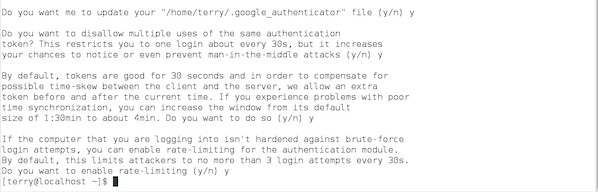
Fig.03: Google Authenticator Linux options
Finally, add the following line to /etc/pam.d/gdm-password file:
auth required pam_google_authenticator.so
Save and close the file. On your next login, you should see a prompt for a verification code:
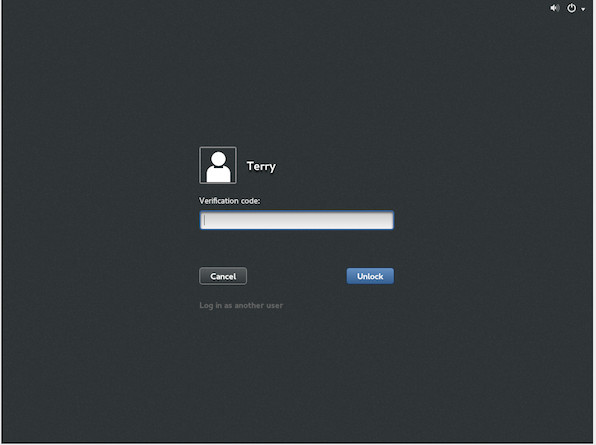
Fig.04: Google Authenticator code to protect Linux desktop login
Enter the one time password generated by the Google Authenticator app and you will be logged in:
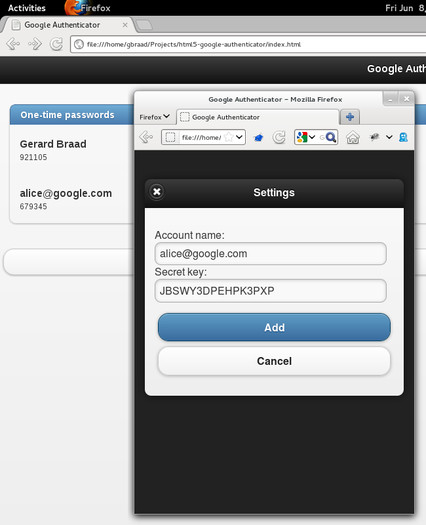
Fig.05: Firefox based Google Authenticator App in action
How can I get Google Authenticator tokens?
You can download app from the following location as per your device/browser to retrieve Google Authenticator tokens:
- Google Authenticator Apple iOS app - Works with 2-Step Verification for your Google Account to provide an additional layer of security when signing in.
- Google Authenticator android app - Generates 2-step verification codes on your phone.
- Google Authenticator Firefox app - Generates TOTP tokens when multi-factor authentication using Firefox.
- See the list of all Google Authenticator apps
Secure your OpenSSH server using two-step authentication on a Fedora / RHEL / CentOS Linux
This can be applied to SSH logins as well. Although disabling password logins for SSH and limiting it to SSH keys only is a good idea, this might not be possible in some environments. In such cases, adding two factor authentication can be a good compromise. Adding TOTP to SSH is easy as well.
Assuming you have already went through the above configurations, only two other steps is required.
First, add the following line to /etc/pam.d/sshd:
auth required pam_google_authenticator.so
Next, ensure that the /etc/ssh/sshd_config has the following line:
ChallengeResponseAuthentication yes
Save and close the file. Restart the sshd service:
sudo service sshd restart
## OR ##
sudo systemctl restart sshd.service
On your next SSH login, you should be promoted for a verification code in addition to the usual password:
login as: nixcraft
Verification code:
Password:
This article was contributed by Terry Chia.
No comments:
Post a Comment