Twitter is a force to be reckoned with. Millions of people use Twitter to talk about general happenings in the world and their lives. Large events like conventions, elections, and uprisings have a habit of crashing the Twitter servers.
You, an avid DIY hacker, want to know how to use that massive stream of digital social media. There are plenty of fun projects built around Tweeting something that happens. Today, we offer you an alternative: make something happen when a specific Tweet occurs.
This is a basic project that will walk you through the steps to get an LED flashing when a specific hashtag appears in the Twitter stream. While a blinking LED might not be the most exciting of outcomes, attaching Twitter to the physical world will get you started on creating that Twitter controlled robot.

Blink an LED whenever specific hashtag appears in a Tweet
Suggested Reading
We need to build a rather simple LED circuit to connect to the Raspberry Pi’s GPIO header. Be sure you are familiar with LEDs and resistors.
- Light-emitting Diodes (LEDs)
- Resistors
- How to Use a Breadboard
Required Components
You will need to have a Raspberry Pi running Linux of some sort. We recommend the latest version of Raspbian, as it comes pre-loaded with Python and GPIO libraries. Additionally, the Pi will need to be connected to the Internet so that you can monitor the Twitter stream. This can be accomplished using an Ethernet cable or a USB WiFi dongle. If you like checklists, this is for you:
Raspberry Pi Twitter Monitor


If you are not planning to use SSH to access your Pi, you will also need a keyboard and a monitor.
Hardware Hookup
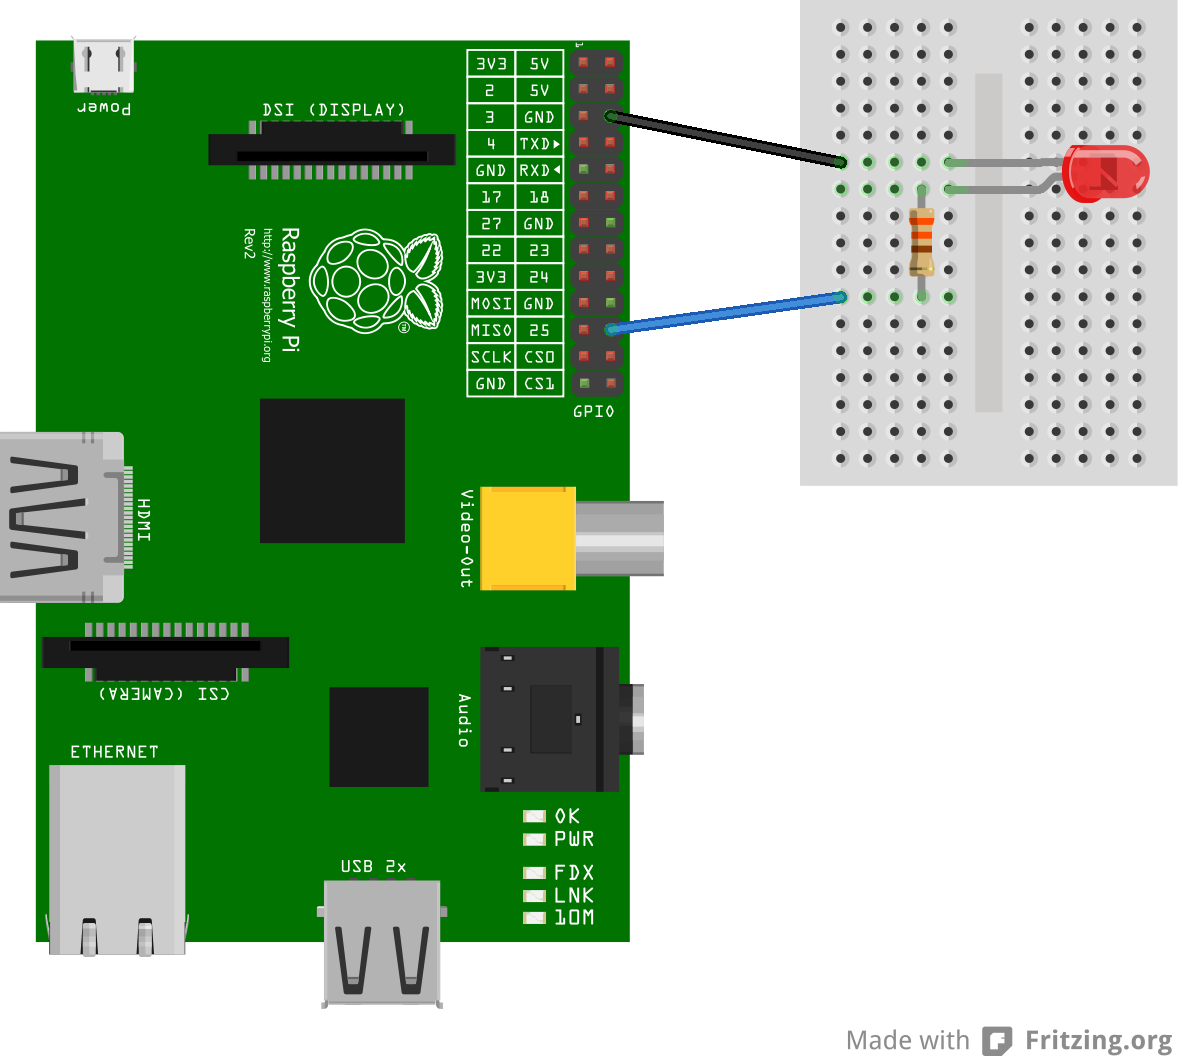
Connect an LED to your Raspberry Pi following this diagram:
Additionally, you will want to plug in the rest of your peripherals (keyboard, monitor, SD card, Ethernet/WiFi) to your Pi. If you are not using a keyboard and monitor, then you will need to find some way to access your Pi, such as SSH.

The GPIO pins connected to an LED
Register Your Twitter App
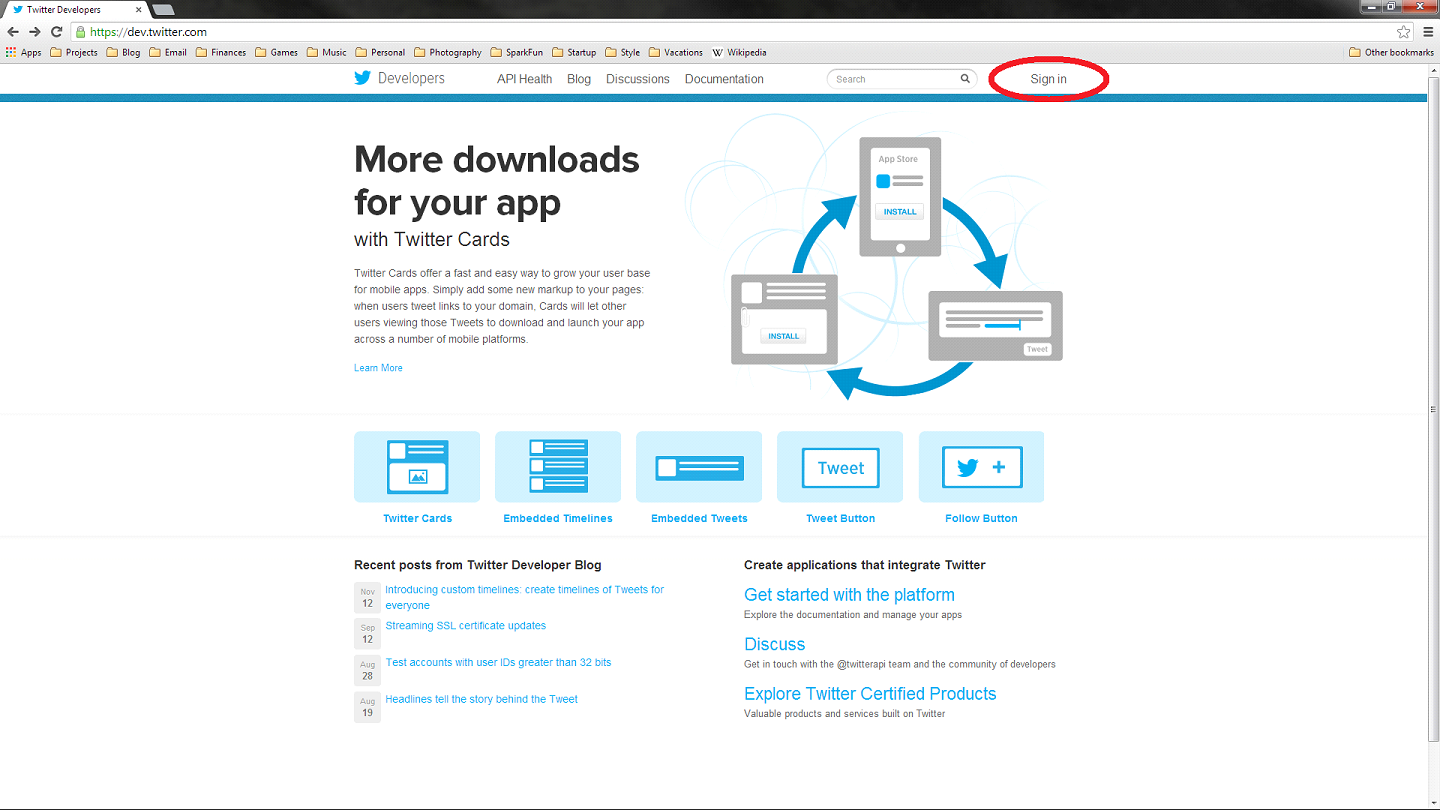
In order to interact with Twitter (including searching, monitoring, posting, etc.), you will need to register your application. This is accomplished by going to https://dev.twitter.com/.
Click the “Sign In” button at the top-right of the screen and enter your Twitter credentials (you can also sign up if you don’t have a Twitter account).
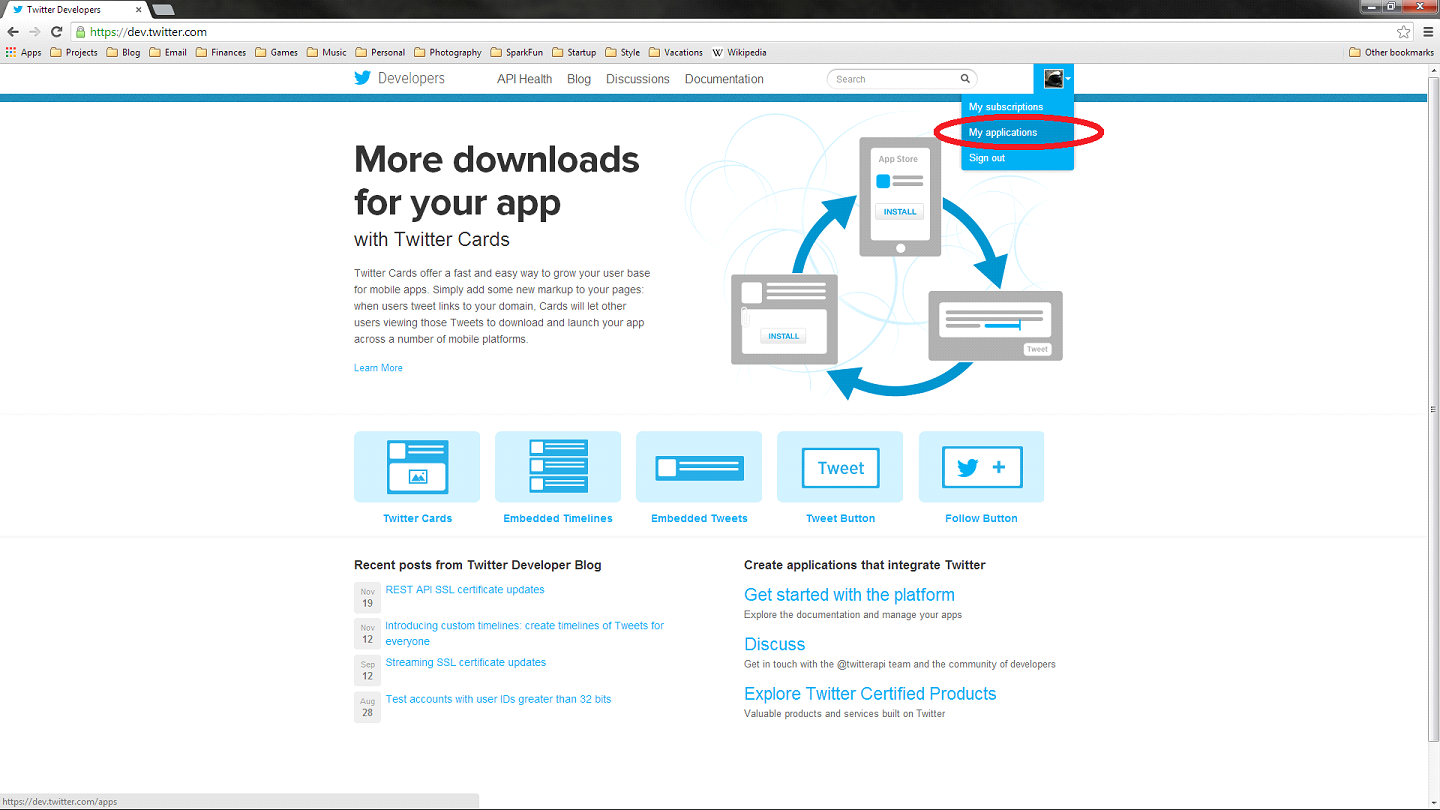
Once you have signed in, click on your user icon, and select “My Applications.”
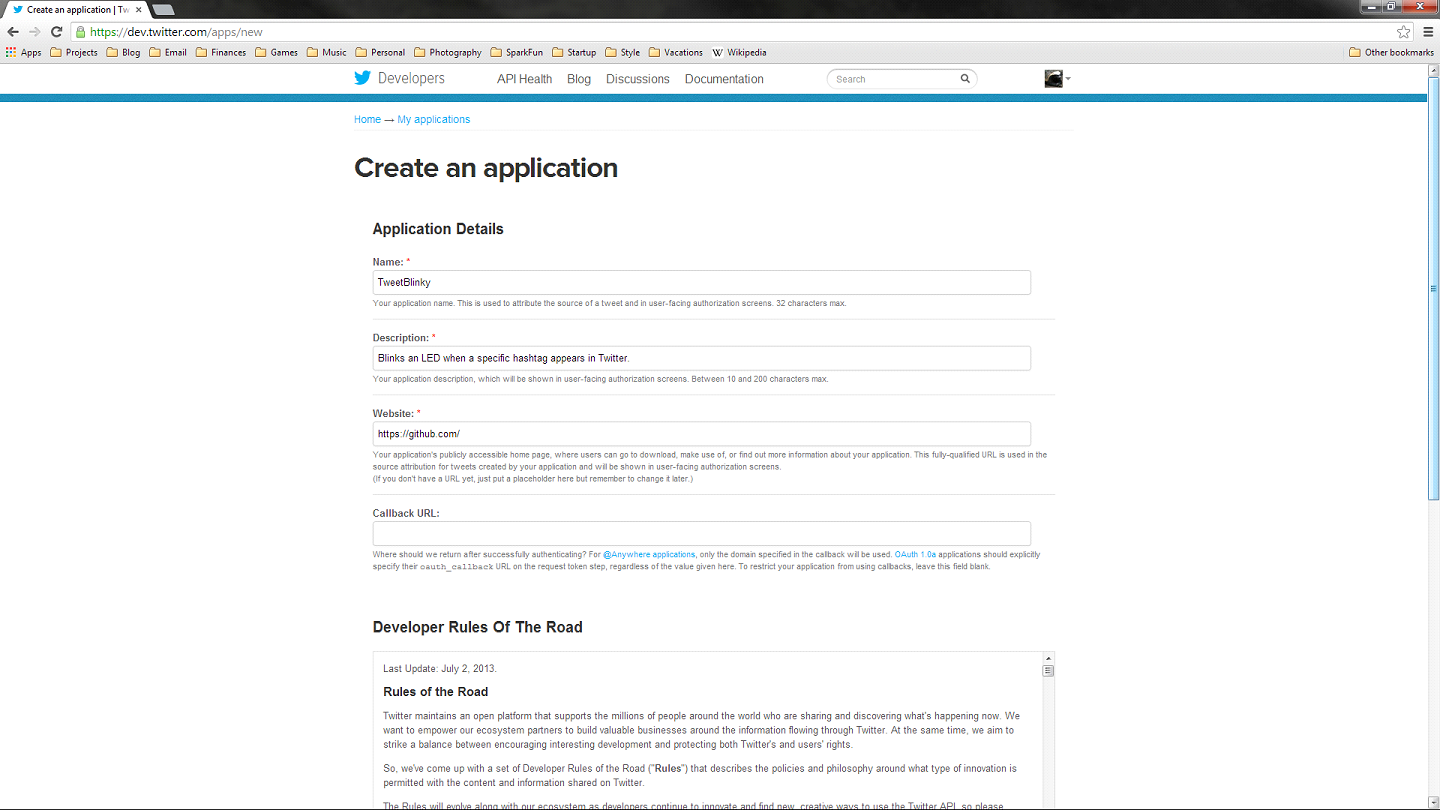
Click the “Create a new application” button, and you will be presented with a form to fill out about your application. Fill out the name and description fields. For “Website,” you can put something random, like http://github.com or something else that looks legitimate. At the bottom of the page, click the checkbox to agree to the rules, fill out the Captcha, and click the “Create your Twitter application” button.
Once completed, you will be presented with a dashboard for your registered application. You need to create an access token, so click the “Create my access token” button at the bottom of the screen.
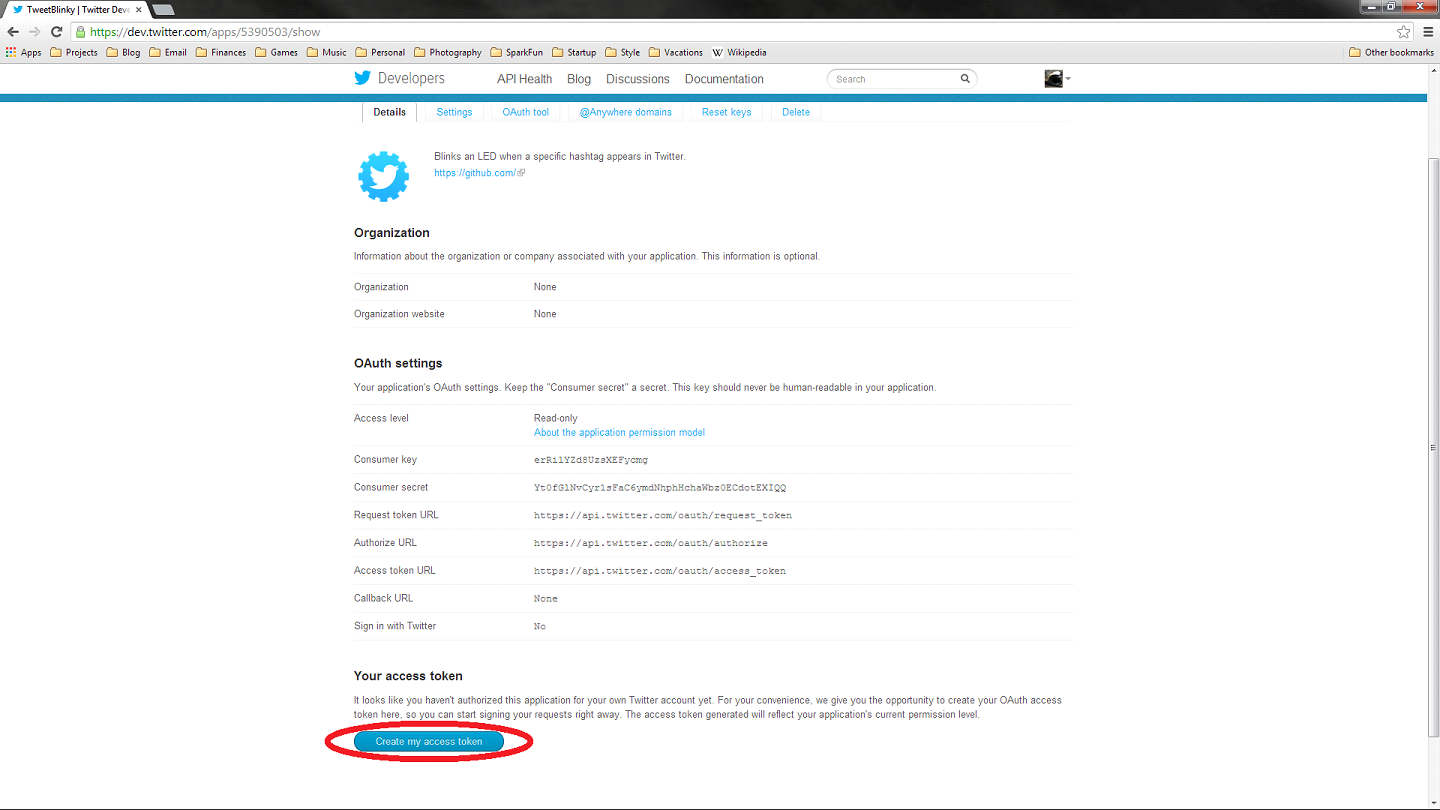
Wait a few seconds and then refresh the page. You should see a section titled “Your access token” at the bottom. Copy down the “Consumer key,” “Consumer secret,” “Access token,” and “Access token secret.” We will need these for our application. Note that we set up this Twitter application as an example. It will have been deleted by the time you read this, so don’t be trying to use our tokens!

Install Required Packages
If you are using a relatively new release of Raspbian, it should already contain Python and the necessary modules to talk to the Pi’s GPIO pins. We will still need to install modules to search Twitter with Python. Several exist, but I recommend Twython if you are following this tutorial. Boot up your Pi and connect to the Internet (Ethernet, WiFi, etc.). If you use the X Windows interface, open up a console window and install Twython:
sudo apt-get update
sudo apt-get install python-pip
sudo pip install twython
[UPDATE: 2/6/14]: From Mark A. Yoder - to get this working on the BeagleBone Black, install the following packages in addition to the ones above:
sudo apt-get install python-dev
pip install Adafruit_BBIO
Code
With our packages installed, we can write our program. Open up a text editor and make a new Python script. For example:
language:python
nano TweetBlinky.py
In the new file, enter the code below.
language:python
import time
import RPi.GPIO as GPIO
from twython import TwythonStreamer

# Search terms
TERMS = '#yes'

# GPIO pin number of LED
LED = 22

# Twitter application authentication
APP_KEY = 'erRilYZd8UzsXEFycmg'
APP_SECRET = 'Yt0fGlNvCyr1sFaC6ymdNhphHchaWbz0ECdotEXIQQ'
OAUTH_TOKEN = '1969690717-6a2RgVPXanSBaAjuie7EmUWZh78me8UZ6UxcM8V'
OAUTH_TOKEN_SECRET = 'UIrYV2XbYZC3vHzer6ZxIDwqVa0VvynQLDJYnSQV0R3xt'

# Setup callbacks from Twython Streamer
class BlinkyStreamer(TwythonStreamer):
        def on_success(self, data):
                if 'text' in data:
                        print data['text'].encode('utf-8')
                        print
                        GPIO.output(LED, GPIO.HIGH)
                        time.sleep(0.5)
                        GPIO.output(LED, GPIO.LOW)

# Setup GPIO as output
GPIO.setmode(GPIO.BOARD)
GPIO.setup(LED, GPIO.OUT)
GPIO.output(LED, GPIO.LOW)

# Create streamer
try:
        stream = BlinkyStreamer(APP_KEY, APP_SECRET, OAUTH_TOKEN, OAUTH_TOKEN_SECRET)
        stream.statuses.filter(track=TERMS)
except KeyboardInterrupt:
        GPIO.cleanup()
Alternatively, you can download a zip file of the script here.
IMPORTANT: You will need to change the Twitter authentication tokens! Right now, they are set to my example application. Copy the strings from the your dev.twitter.com page (the single quotes are needed):
language:python
APP_KEY = ‘<Your Consumer Key>’
APP_SECRET = ‘<Your Consumer Secret>’
OAUTH_TOKEN = ‘<Your Access Token>’
OAUTH_TOKEN_SECRET = '<Your Access Token Secret>’'
Save and exit (ctrl + X and ‘y’ if you are using nano).
Dissecting the Code
We could just give you the code to copy-and-paste into your Pi (which we did). However, the Python script is a bit more complicated than just blinking an LED, so we should take a moment to discuss what is going on.
At the top of the code, we import our necessary Python modules. We need “time” to call our ½ second delay when we blink our LED. “RPi.GPIO” is a pre-build Python package for the Raspberry Pi that gives us access to the GPIO pins. This is why we recommend the Raspbian build of Linux. Finally, “twython” is the package that connects us to Twitter allowing us to monitor the stream, search, and post.
language:python
import time
import RPi.GPIO as GPIO
from twython import TwythonStreamer
Next, we add our global constants. TERMS holds a string (or strings) of things we want to search for on Twitter. LED contains the pin number for the GPIO header. Note that this is the pin number of the header and not the GPIO number. The Twitter authentication constants hold the token strings that we copied from the dev.twitter.com page. Remember: you need to change this section to your specific Twitter token strings.
language:python
# Search terms
TERMS = '#yes'

# GPIO pin number of LED
LED = 22

# Twitter application authentication
APP_KEY = ‘<Your Consumer Key>’
APP_SECRET = ‘<Your Consumer Secret>’
OAUTH_TOKEN = ‘<Your Access Token>’
OAUTH_TOKEN_SECRET = '<Your Access Token Secret>’'
The next section is the crux of the Twitter monitor. If you have never dealt with class inheritance or callbacks before, we recommend brushing up on those concepts in order to really understand this section of code.
We create a new class that inherits TwythonStreamer (a class within Twython). While TwythonStreamer handles a bunch of stuff in the background (including communicating with the Twitter API), we are only concerned with the callback on_success(). This is a specially named method that gets called whenever a Tweet appears matching our search terms criteria. The important thing to understand is that we never call this method from within our script. An outside force (e.g. thread, program) calls on_success() for us. We just have to define what happens when that method is called. To use it, we create a BlinkyStreamer object and Twython handles the rest.
Inside of on_success() is what we want to happen whenever a successful Twitter hit occurs. In this case, we make sure there is a ‘text’ field within the Tweet (meaning that the Tweet contains actual text from a user), and we print the Tweet’s text to the console and flash the LED for ½ second.
language:python
# Setup callbacks from Twython Streamer
class BlinkyStreamer(TwythonStreamer):
        def on_success(self, data):
                if 'text' in data:
                        print data['text'].encode('utf-8')
                        print
                        GPIO.output(LED, GPIO.HIGH)
                        time.sleep(0.5)
                        GPIO.output(LED, GPIO.LOW)
For those of you that are code-savvy, you might say, “Hey, wait a minute! That sleep function is blocking! You can’t receive tweets while flashing the LED.” And you would be correct. This is just a plain simple way to monitor Tweets. To “properly” do this, you would want to set up a separate thread in Python that monitors Tweets and puts them into a queue. Another thread would read that queue and flash the LED as quickly as Tweets are put into the queue. Threading is a bit too much for this tutorial, but if you would like to learn how, feel free to check out Threading in Python.
The GPIO setup section should look familiar if you have ever played with an Arduino or other microcontrollers. We need to tell the Raspberry Pi that we will be referencing its GPIO headers by board number (pin 1, pin 2, pin 3, etc.), that we want our LED pin to be an output, and initialize the LED to off (logic LOW).
language:python
# Setup GPIO as output
GPIO.setmode(GPIO.BOARD)
GPIO.setup(LED, GPIO.OUT)
GPIO.output(LED, GPIO.LOW)
Finally, we create an instance of our BlinkyStreamer class and let it do its thing. When we create a TwythonStreamer object (remember: our BlinkyStreamer inherits TwythonStreamer), we need to feed it our Twitter authentication information that we set earlier. Twython uses this information to connect to the Twitter servers. We provide the filter() method within TwythonStreamer some search terms and the streamer begins to monitor Twitter. Whenever one of the terms appears in the Twitter stream, the on_success() method (defined above) is called.
language:python
# Create streamer
try:
        stream = BlinkyStreamer(APP_KEY, APP_SECRET, OAUTH_TOKEN, OAUTH_TOKEN_SECRET)
        stream.statuses.filter(track=TERMS)
except KeyboardInterrupt:
        GPIO.cleanup()
Because the filter() method is blocking, the program will run forever until we manually kill it. We can terminate the program by pressing ctrl+c keys. We wrap the streamer calls in a try/catch statement so that the GPIO pins can be released when we tell Python to exit. If we do not do this, Python will issue a stern warning that the GPIO pins are in use by another program.
Run!
This is important. In order to use the GPIO pins from a Python script, you need to run the script with superuser privileges. So, enter the following command:
sudo python TweetBlinky.py
Sit back and watch the fun! As people issue the ubiquitous #lol hashtag, you will see the Tweets appear in your console.
DISCLAIMER: This is Twitter we are talking about. We can make no guarantee regarding the appropriateness of comments that might appear on your screen.
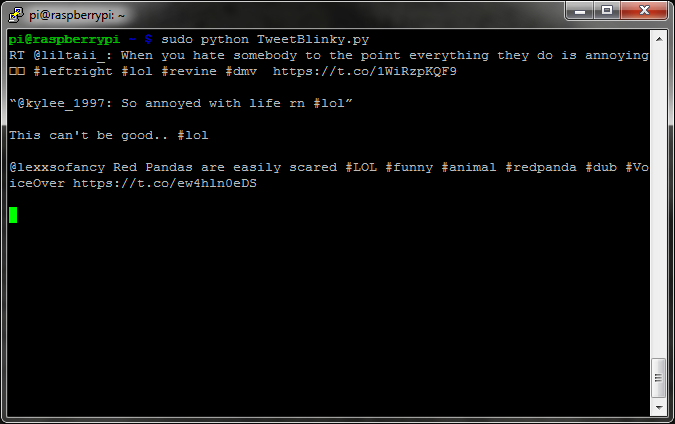
Now, look over at your Raspberry Pi. That LED that you hooked up should flash with every incoming Tweet that contains the hashtag #lol.

The LED flashes for ½ second on an incoming Tweet with the appropriate hashtag
When you want to end the program, press ctrl+c.
Going Further
So, you got something that flashed to notify you of Tweets. Great! The LED is just a start. Just about anything can be hooked up to the Raspberry Pi to notify you of Twitter activity. Let your imagination run wild…

A car horn to alert you of incoming Tweets? Why not?!
If you want to dig deeper into the Twython package, check out the Github repository here:https://github.com/ryanmcgrath/twython
The Raspberry Pi may not be as good at connecting to low-level peripherals as the Arduino, but it does offer a number of options on its 26-pin header. If you are looking to hook up additional hardware to the Pi, take a look at the RPi’s Low-Level Peripherals page. Remember: the Pi uses 3.3V logic!
I was searching for loan to sort out my bills& debts, then i saw comments about Blank ATM Credit Card that can be hacked to withdraw money from any ATM machines around you . I doubted thus but decided to give it a try by contacting {skylinktechnes@yahoo.com} they responded with their guidelines on how the card works. I was assured that the card can withdraw $5,000 instant per day & was credited with $50,000 so i requested for one & paid the delivery fee to obtain the card, i was shock to see the UPS agent in my resident with a parcel{card} i signed and went back inside and confirmed the card work's after the agent left. This is no doubts because i have the card & has made used of the card. This hackers are USA based hackers set out to help people with financial freedom!! Contact these email if you wants to get rich with this Via email skylinktechnes@yahoo.com whatsapp/t: +1(213)785-1553
ReplyDelete